30 DIY Home Decor Projects That Look Store-Bought

Walk into any home decor store and flip a price tag. A small textured vase, forty dollars. A simple plaster bowl, sixty. A sunburst mirror, one hundred and fifty.
Look closer at what you are really buying. Paint on a cheap vase. Plaster over a balloon. Sticks glued around a round mirror. The store is not selling magic. It is selling the finished look.
I know because I have made every piece in this list with my own hands. So here are thirty DIY home decor projects that look store-bought. Same look, tiny budget, and every one of them is simpler than you think.
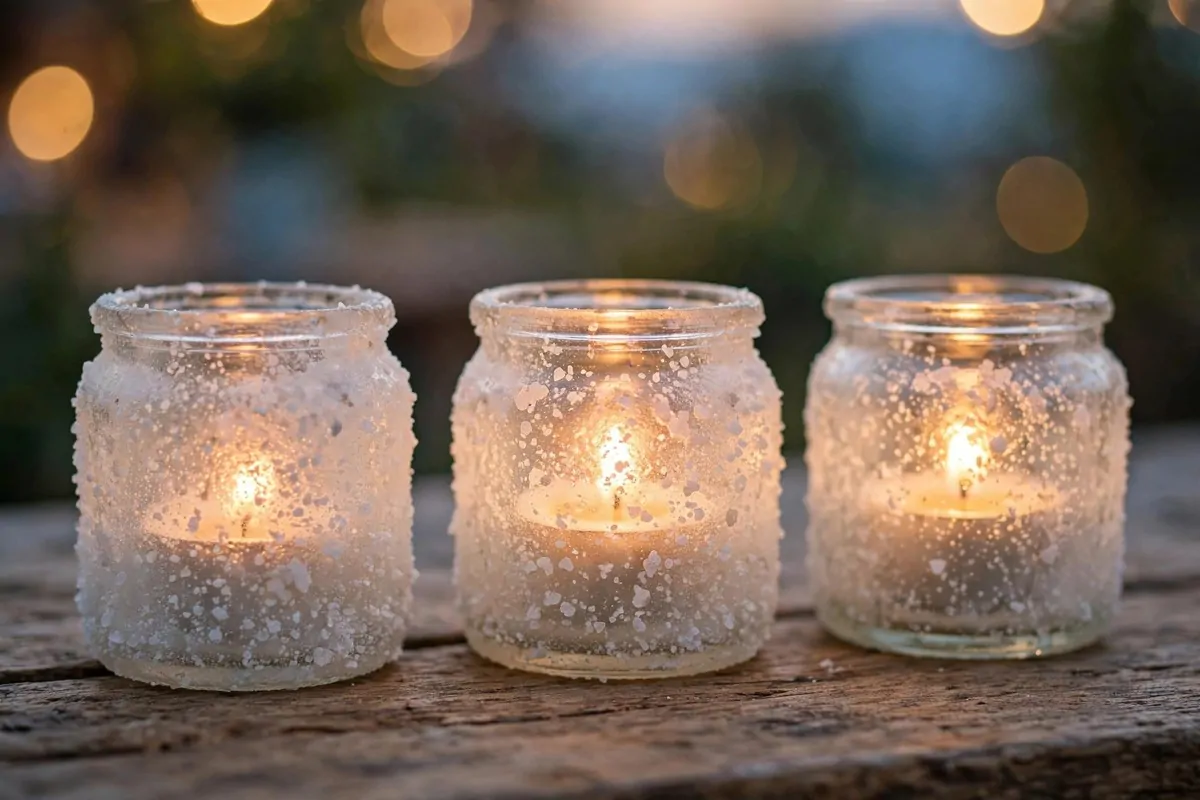
Frost Plain Jars Into Glowing Candle Holders
It looks expensive. And it hides every fingerprint.
It looks expensive.
The jars can come from your kitchen cabinet. I used old jam jars for my first set.
The jars can come from your kitchen cabinet.
Wash the jars and dry them well. Any grease will stop the salt from sticking.
Brush a thin, even coat of glue on the outside of the jar. Work on one jar at a time so the glue does not dry early.
Roll the jar in sea salt while the glue is still wet. Cover every bit of the outside.
The salt clumps a little.
That is fine. That is what makes it pretty.
Let the jars dry standing up for a few hours. Then gently tap off the loose salt over a tray.
Tie a bit of twine around the neck of each jar. A small sprig of dried lavender tucked under the twine looks like a gift from a boutique.
Put a tealight inside. When it glows, the frosted salt scatters the light in the loveliest way.
Here is what you need for each holder:
- One plain glass jar, any size
- White craft glue or Mod Podge
- Coarse sea salt, about half a cup
- Twine and a small dried sprig (optional)
Keep these holders dry, and never burn a tall candle in them. Tealights only.
Keep these holders dry, and never burn a tall candle in them.
I just smiled and said nothing for a second. Then I told her, and she did not believe me at first.
I just smiled and said nothing for a second.
They also make great little gifts. Make three, tie them together with ribbon, and you have a hostess gift that looks thoughtful. Because it is.
Turn a Cheap Vase Into Stone-Textured Pottery
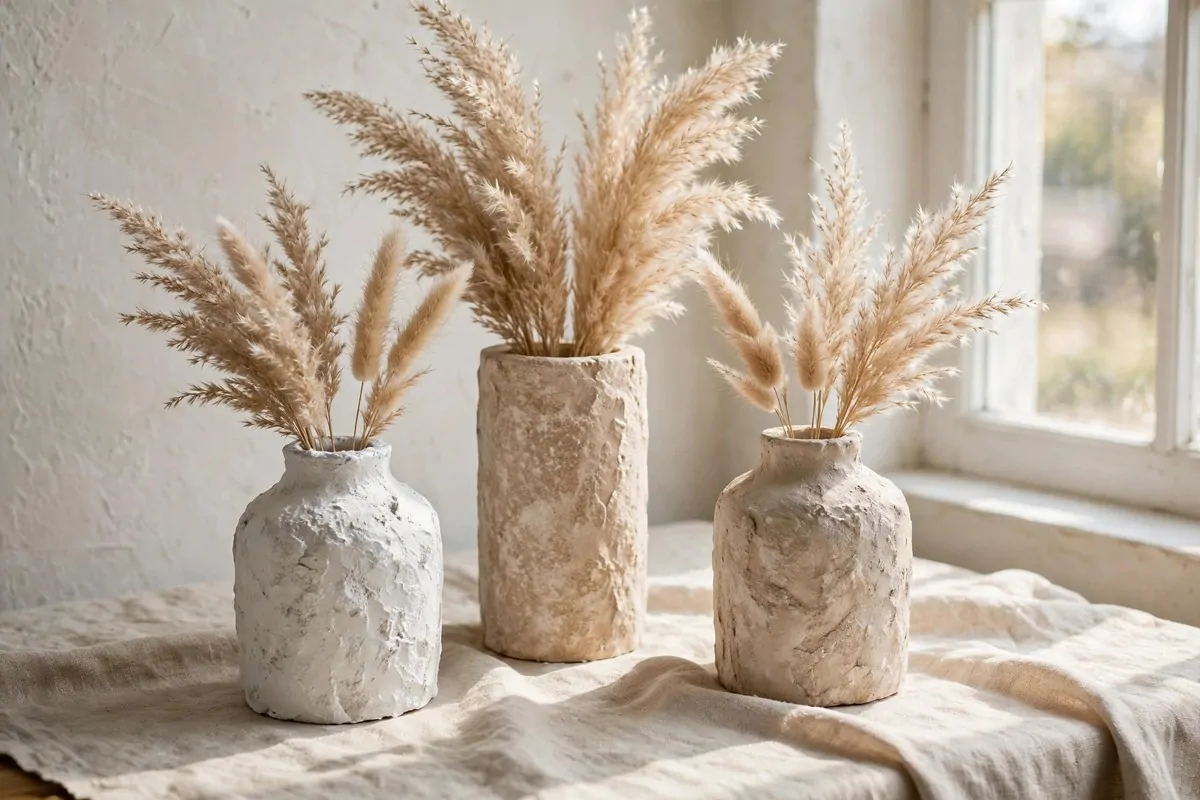
This is the trick I use most. A plain glass vase from the dollar store, painted so it looks like heavy stoneware. Nobody can tell the difference on a shelf.
Smooth paint never fools anyone. So we fake the roughness.
Smooth paint never fools anyone.
Grab a glass vase or even a tall jar. Clean it well. Glass paint does not stick to dust or oil.
Mix your paint. Use matte acrylic or chalk paint in a warm white or beige.
Then stir in a spoonful of baking soda.
This is the magic part. The baking soda gives the paint a sandy, stone-like body.
Brush the mixture onto the vase. Do not aim for smooth.
Dab and stroke in different directions.
Two or three coats is best. Let each coat dry fully before the next one.
The vase will look lumpy and odd after the first coat. Keep going. By the third coat it looks like handmade pottery.
Sand it very lightly with fine sandpaper when it is fully dry. Just a quick once-over. This knocks off the sharp bits and makes it feel like real ceramic.
Finish with a clear matte sealer if you want. This keeps the paint from chipping when you water your stems.
I keep a set of three of these on my bookshelf. They are different heights, all in the same creamy color. Guests always assume they came as a set from a fancy store.
Glossy paint shines like plastic and ruins the illusion. Matte is what makes it look like stone.
Glossy paint shines like plastic and ruins the illusion.
The dated one. Paint changes everything.
The dated one.
Sculpt a Plaster Bowl Over a Balloon
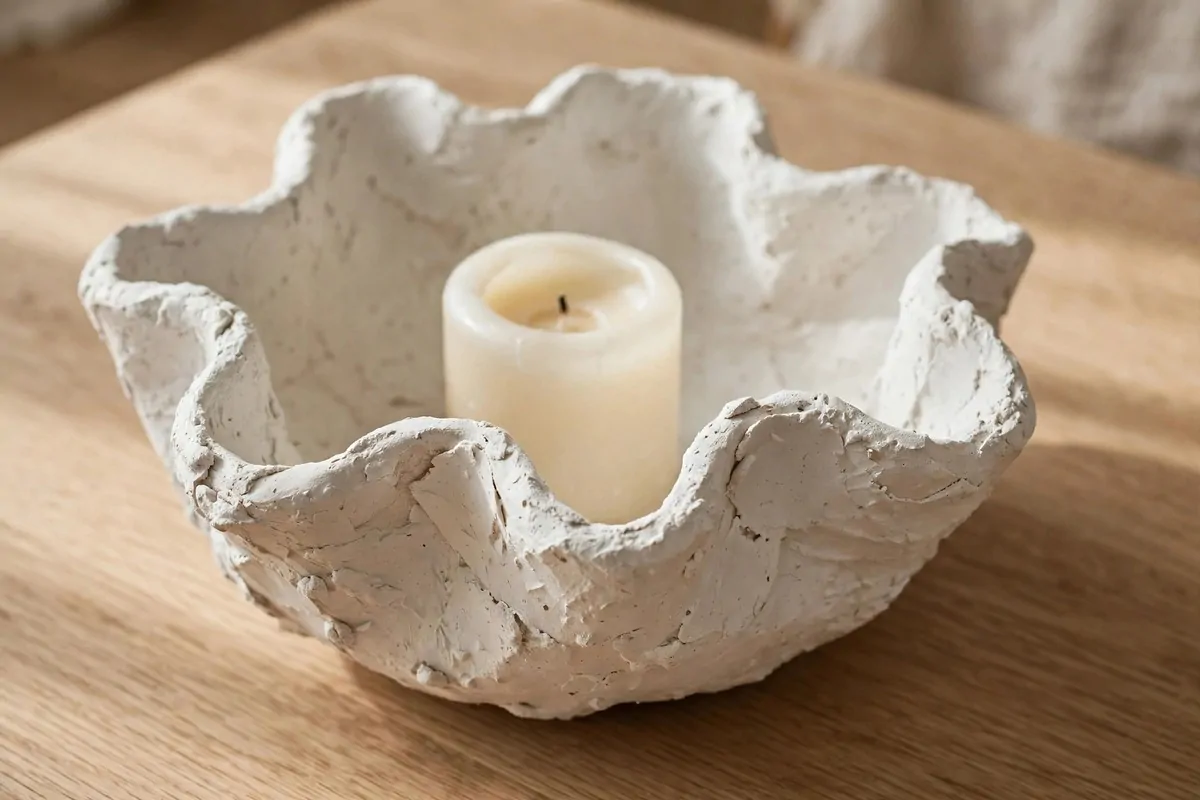
This bowl costs almost nothing to make. A balloon, some joint compound, and a day of drying. The result looks like something from a design studio.
Blow up a balloon to the size you want your bowl. Set it in a bowl or cup so it stays still, knot side down.
Spread a thin layer of petroleum jelly on the top half of the balloon. This stops the plaster from sticking forever.
Too runny and it slides off. Too thick and it cracks later.
Too runny and it slides off.
Keep the edges wavy and uneven. Perfect edges look machine-made, and we want handmade charm.
Keep the edges wavy and uneven.
Let it dry for a full day. Do not rush this. The inside takes longer than the outside.
Pop the balloon. Peel it away gently. If the bowl wobbles, sand the bottom lightly until it sits flat.
Sand the outside smooth-ish, then paint it matte white or cream. The paint hides small bumps and makes it look like real plasterware.
This bowl is decorative only. Do not serve food in it. Use it for candles, keys, or dried flowers.
The drying did the rest. Now I have four of them around the house, and I am honestly a little proud every time someone asks about them.
The drying did the rest.
If your bowl cracks while drying, do not cry. Smear a little more compound over the crack and let it dry again. Nobody will ever know.
Paint Textured Plaster Art That Looks Like a Gallery Piece
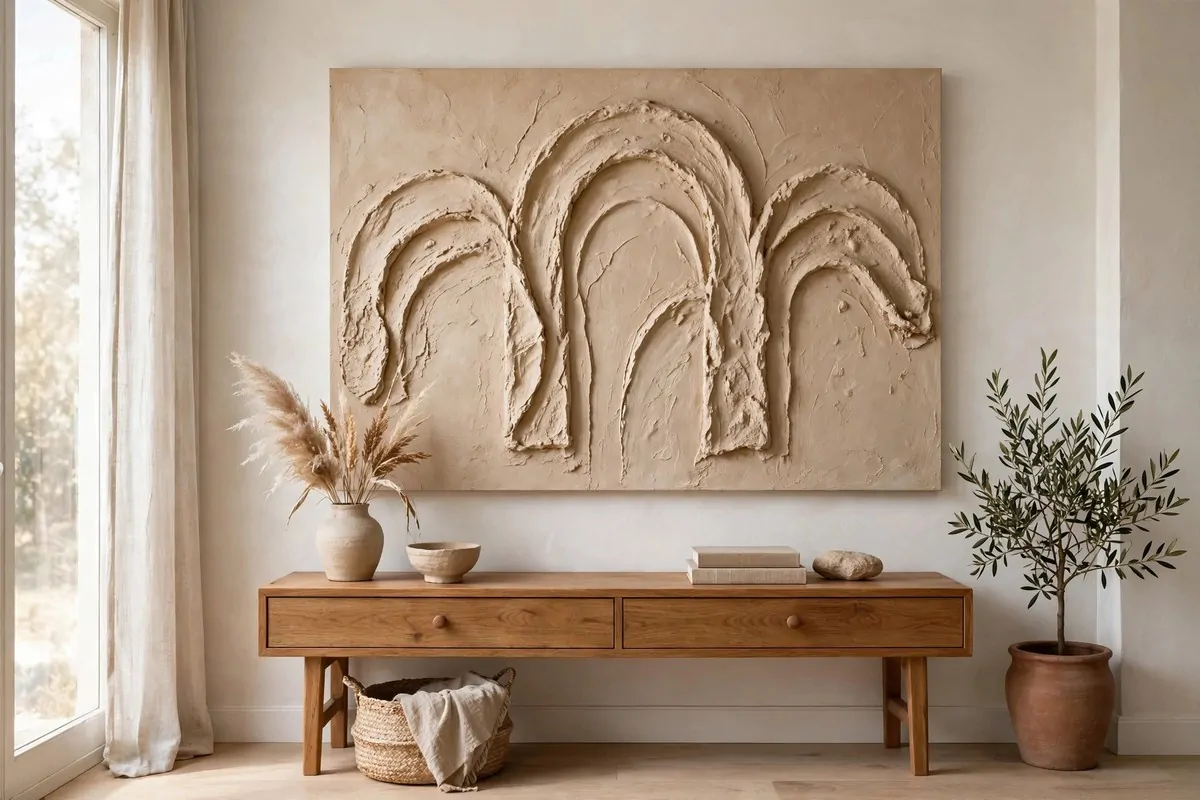
Big abstract art costs a fortune. A blank canvas costs very little. And plaster art is just canvas plus joint compound plus a putty knife.
This style is everywhere right now. Sculptural arches, soft waves, rough textures in one single color. It looks high-end because it feels like something, not just a print.
Small textured art looks cute. Big textured art looks like money.
Small textured art looks cute.
Scoop it, drag it, leave ridges. The messier your strokes, the more interesting the final piece.
Scoop it, drag it, leave ridges.
Fill inside the arch with thick plaster. Pull the tape off while it is still wet.
Fill inside the arch with thick plaster.
Or try waves. Drag the knife in long slow curves across the whole canvas. Keep the thickness uneven on purpose.
Let it dry overnight. It will shrink a tiny bit. That is normal.
Use a dry brush so the paint catches the high spots and leaves the low spots a touch darker. This is what gives it depth.
Use a dry brush so the paint catches the high spots and leaves the low spots a touch darker.
Hang it where light hits it at an angle. Morning light across the ridges makes the texture glow. Flat overhead light flattens it.
One canvas in the right spot can carry a whole wall. I hung a huge one over my sofa and people think I hired an artist.
If you mess up, you can scrape it off and start over while it is wet. The canvas does not care. This project is very forgiving, which I love.
Build a Sunburst Mirror From Wooden Shims
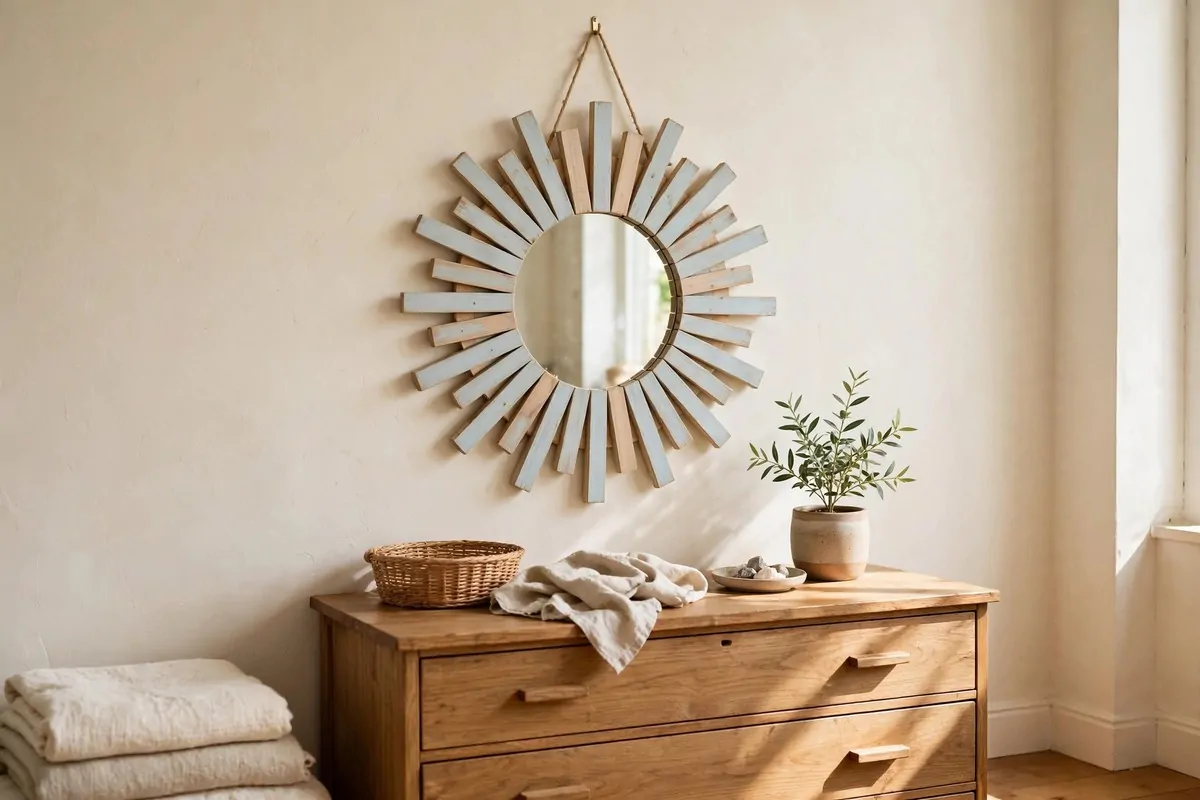
Sunburst mirrors show up in every fancy catalog. They also show up in craft stores for silly prices. You can build one for the cost of a bag of wooden shims and a round mirror.
Start with a round mirror. Six to ten inches wide is a good size. Craft stores sell them cheap.
Get a bundle of wooden shims, the thin wedges used in construction. They are rough and plain, which is perfect because paint fixes everything.
Glue a wooden circle or sturdy cardboard ring to the back of the mirror. This gives the shims something to sit against. Hot glue works, but wood glue holds longer.
Fan the shims out around the circle like sun rays. Alternate long and short ones. This makes the rays look natural instead of stiff.
Glue each shim down and let it set. Take your time here. Crooked rays will bug you every time you walk past.
One even coat, then a second coat. Painting unifies the cheap wood and the mirror edge into one piece.
One even coat, then a second coat.
Hang it with a strong picture hook. It is lighter than it looks.
I made mine in pale blue for my bedroom. It hangs above a simple dresser and it honestly looks like it was made for that wall.
The best part is the shape is forgiving. If a shim sits a little off, it just adds character. Sunbursts are supposed to look a bit wild.
Make a small one for a bathroom or a big one for a living room wall. Same steps, same wow.
Make a Mirrored Tray From a Thrift Store Frame
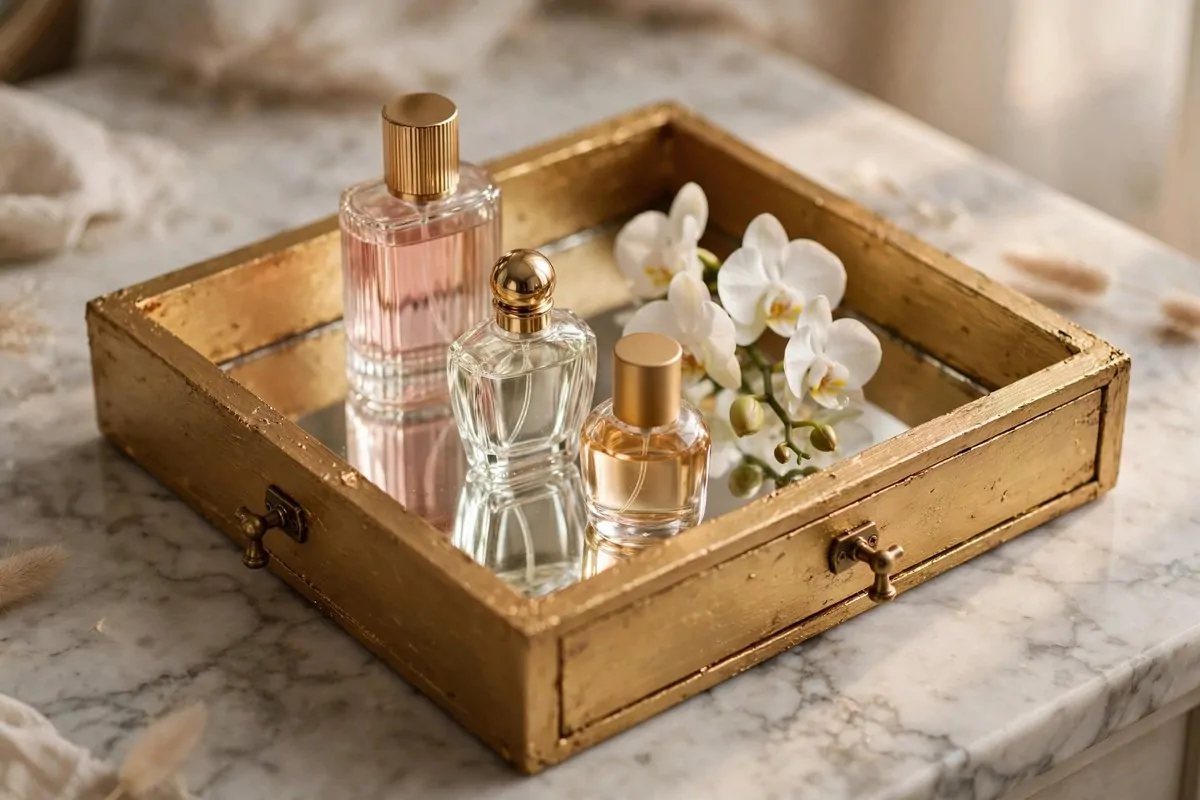
A mirrored tray is one of those things that instantly makes a dresser or coffee table look styled. It groups small things together and makes them look important.
Start with a picture frame that has a glass front. A sturdy wooden frame is best. Thrift stores are full of them.
Two light coats. Let it dry fully between coats.
Two light coats.
Buy two small drawer handles. The kind with two screw holes. They cost very little at a hardware store.
Mark where the handles will go on the two short sides of the frame. Drill small pilot holes through the frame. This step takes two minutes and makes the tray feel real.
Screw the handles on from the inside. Now it looks like a tray, not a frame.
Place the frame glass-side up on your dresser. Put perfume bottles, a small plant, or candles on it. The mirror doubles the sparkle.
Here is a small comparison to help you pick a frame:
| Frame type | Best paint color | Best room |
|---|---|---|
| Chunky wooden frame | Gold | Bedroom vanity |
| Thin modern frame | Matte black | Bathroom counter |
| Ornate carved frame | Silver | Living room coffee table |
The handles are the detail that sells it. Without them it is a frame lying flat. With them it is a tray.
I use mine for perfumes. It turned a messy dresser corner into something that looks like a beauty counter.
Clean the mirror with glass cleaner and a soft cloth. The paint on the frame is fine with a damp wipe.
Wrap a Dollar Store Basket in Jute Rope
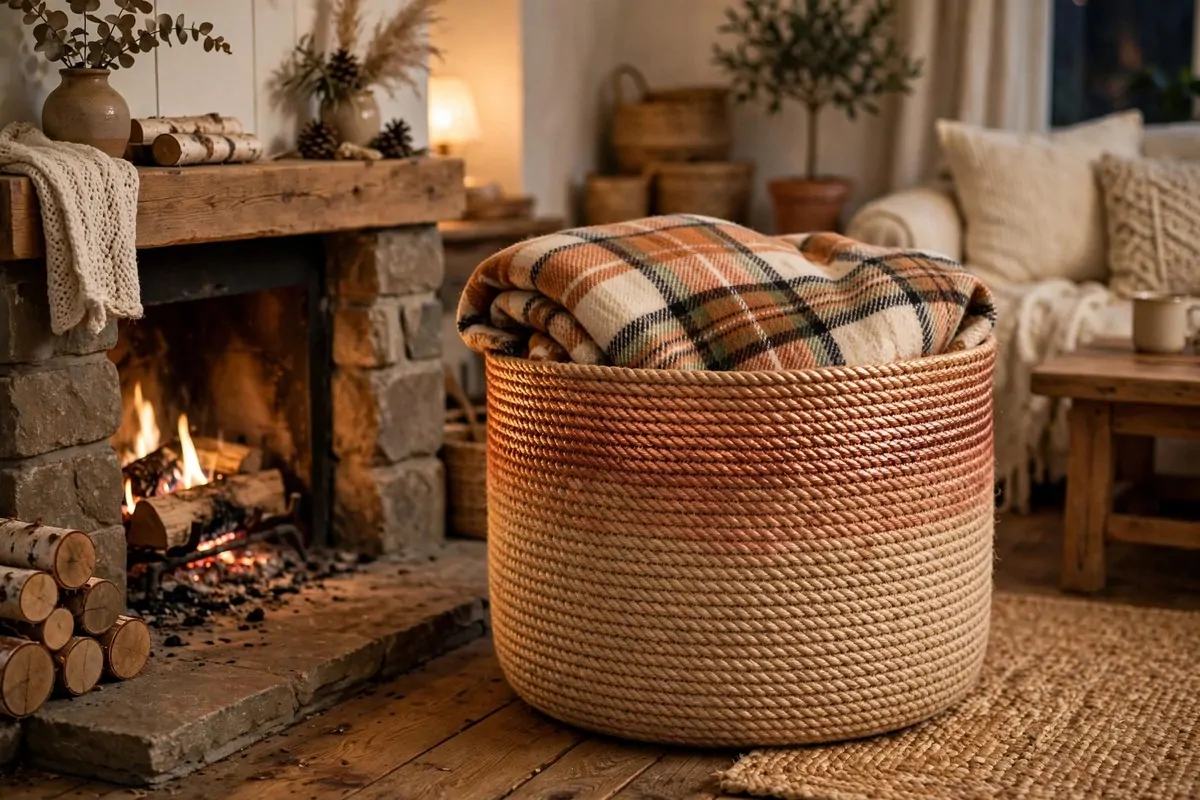
This one changed how I look at the dollar store. Underneath the rope is a plain plastic laundry basket. You would never know.
Start with a round plastic basket. The simpler the shape, the better. Square baskets are harder to wrap neatly.
Flip it upside down on your table. Hot glue the end of a jute rope coil to the bottom center. Then start winding the rope outward in a spiral.
Keep the rows tight together. Gaps show the plastic underneath. Add a dot of hot glue every few inches so the rope stays put.
Work all the way up the sides to the rim. Cut the rope and glue the end flat against the rim.
Mask the top half with paper first. This two-tone look is what makes it seem designer.
Mask the top half with paper first.
Line the inside with fabric if you want. A pillowcase cut to size works fine. Glue it around the inner rim.
Fill it with throws, firewood, or toys. It holds its shape and looks like a real woven hamper.
The whole thing takes under an hour. Most of that time is just winding rope in circles. It is almost relaxing.
I keep mine by the fireplace with a plaid throw in it. It looks like it cost ten times what it did. Nobody guesses it started life as a plastic basket.
Mask a Vase With Tape For a Faux White-Brick Finish
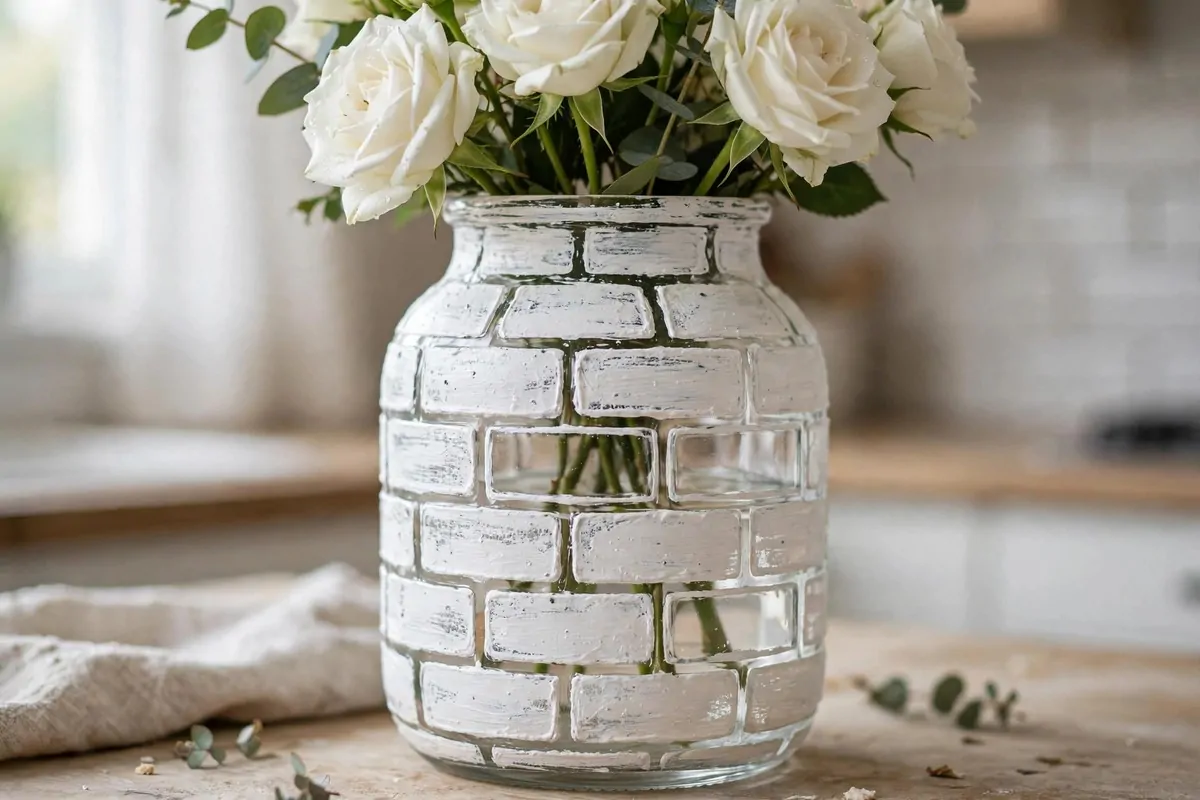
This is a clever one. A plain glass cylinder, some thin tape, and white spray paint. The result looks like a little brick chimney turned into a vase.
Keep them level. Take your time here because straight lines make the whole thing.
Keep them level.
Add short vertical tape pieces between the horizontal rows, spaced about an inch apart. Stagger them like real bricks. This is the step that makes it read as brickwork.
Cover the base of the vase with wide painter's tape. You do not want paint on the bottom.
Spray the whole vase white in light coats. Two or three thin coats beat one thick drippy coat. Let it dry between coats.
Peel the tape off carefully. The clear glass shows through in crisp brick lines. It is so satisfying.
If paint sneaks under the tape, scrape it off gently with a knife. Glass is forgiving that way. This is why this trick works so well on a vase and not on wood.
Fill it with simple stems. White roses, eucalyptus, or even just tall branches. The vase is busy enough that simple flowers work best.
I love how this looks in a kitchen. It has that farmhouse feel without being too country.
Try it on matching jars too. A set of three in different heights makes a great centerpiece for a dining table.
Shape an Air-Dry Clay Vase That Looks Like Stoneware
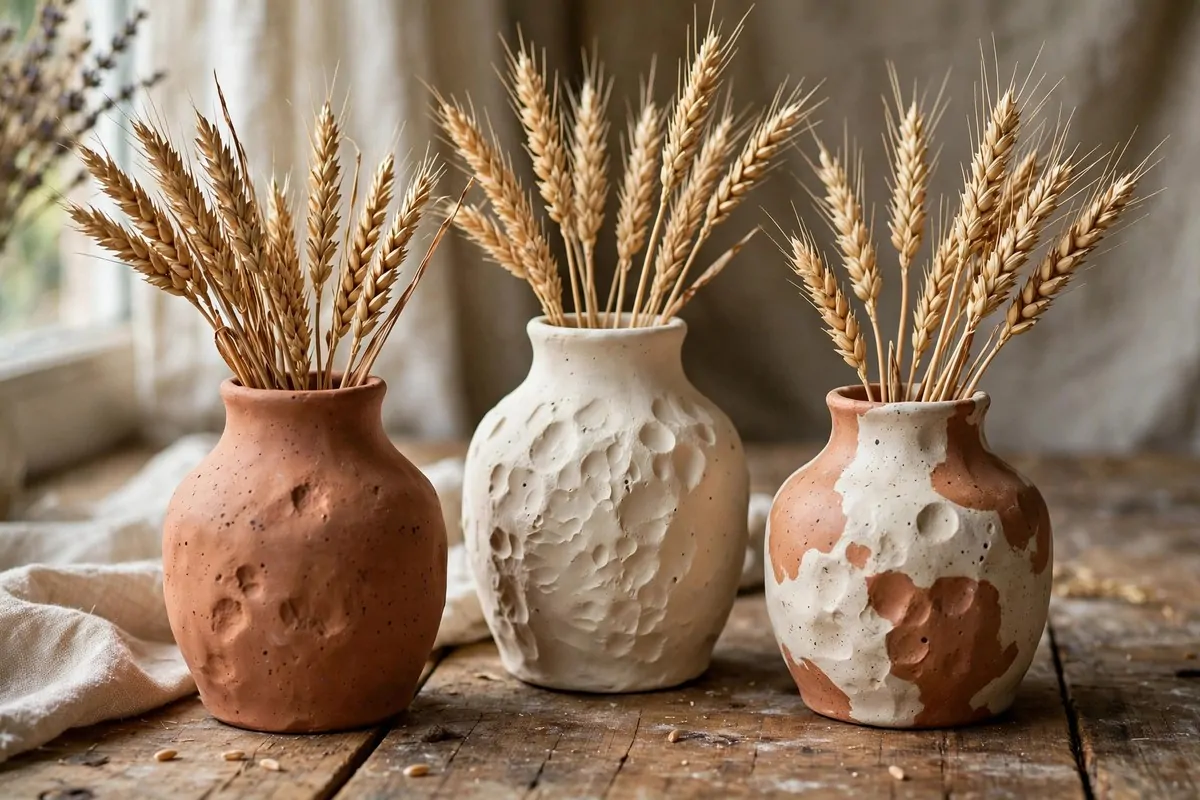
Real handmade ceramics cost a lot. Air-dry clay costs very little. And with the right shaping, nobody can tell your vase did not come from a kiln.
Use a block of air-dry clay. Knead it until it is soft and smooth. Cold clay cracks, so warm it in your hands first.
Pinch the walls upward, turning as you go. Keep the walls even, about a quarter inch thick.
Pinch the walls upward, turning as you go.
Smooth the outside with a damp sponge. Do not aim for machine perfection. Slight wobbles are what make it look handmade and real.
Let it dry for two full days. Turn it upside down on the second day so the base dries too. Rushing this step causes cracks.
Matte terracotta, cream, or soft gray all look like real stoneware. Leave the inside unpainted if you only use dried stems.
Matte terracotta, cream, or soft gray all look like real stoneware.
Seal the outside with matte varnish. This protects the paint and gives it that fired-clay feel.
Use only dried flowers or faux stems in it. Air-dry clay and water are not friends.
And it is still my favorite one because it looks so genuinely handmade. The expensive handmade look is all about those little flaws.
And it is still my favorite one because it looks so genuinely handmade.
Make a few in different sizes. A little family of clay vases on a shelf is one of the prettiest things in my house.
Glue Five Mirrors Into a Chic Storage Box
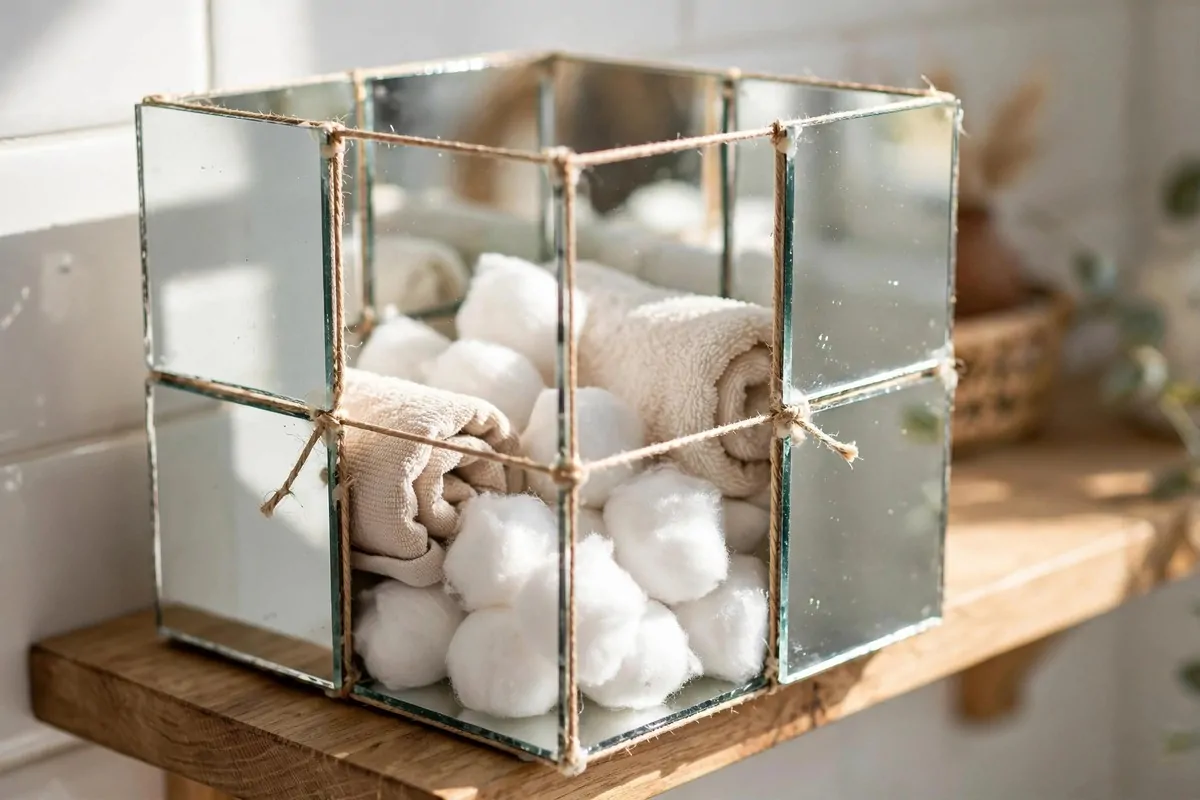
Five square craft mirrors and a glue gun. That is the supply list.
Five square craft mirrors and a glue gun.
Get four beveled mirrors for the sides and one flat one for the base. Craft stores sell them in packs. Check that the edges are smooth so you do not cut yourself.
Press it onto the base, aligned to the outside edge. Hold it for a few seconds.
Press it onto the base, aligned to the outside edge.
Work fast because hot glue sets almost immediately. If a side goes on crooked, just peel it off and start again. The glue peels off glass easily.
Add all four sides. Then run a little glue along the inside corner seams for extra strength.
Stick small felt or cork pads under the base. This keeps it from scratching your shelf.
Fill it with cotton balls, rolled washcloths, or jewelry. The mirrored sides bounce light around and make small bathrooms feel brighter.
I have one on my vanity for hair ties and clips. It catches the morning light and it makes me happy every day. Small things, you know.
Wipe it with glass cleaner and a soft cloth. Do not scrub hard. The mirrors are thin.
Stain Wooden Blocks Into a Candle Holder Trio
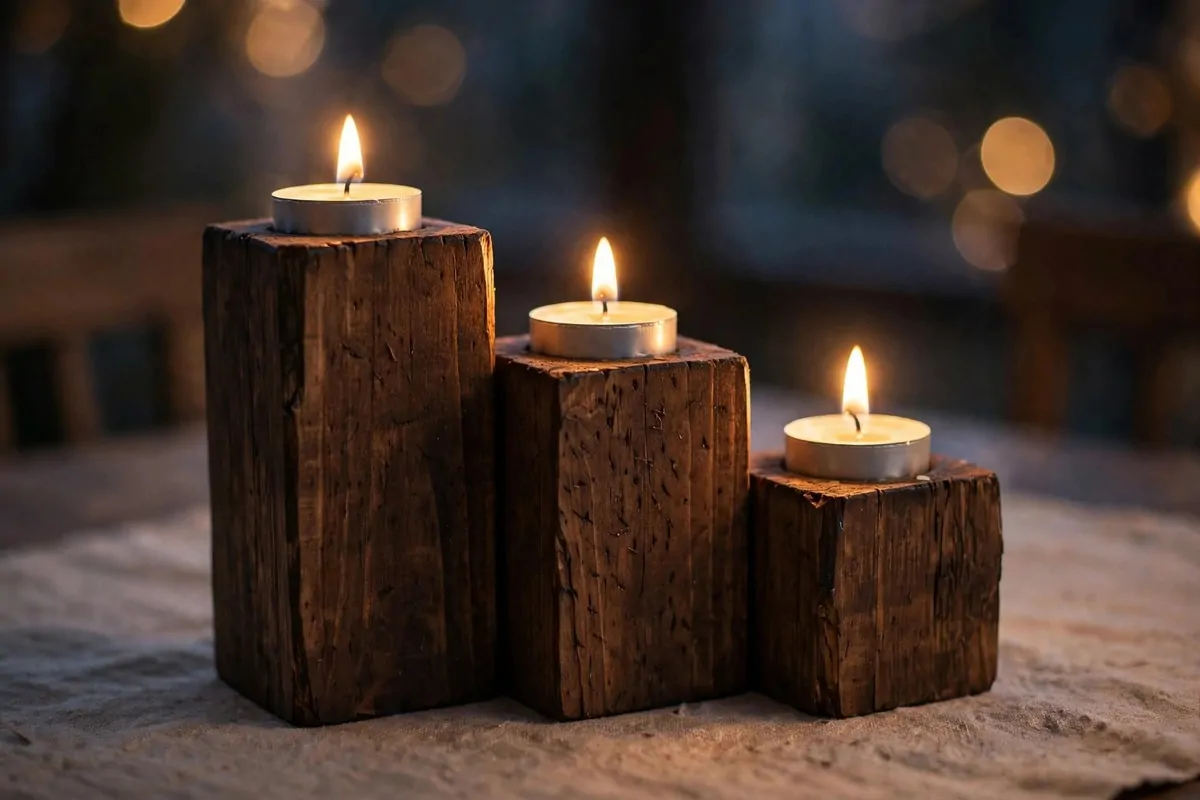
A group of candles is one of the fastest ways to make any table look styled. You do not need expensive holders. Plain wooden blocks do the job beautifully.
Pick three different heights. The height difference is what makes it look designed.
Pick three different heights.
Sand each block smooth with fine sandpaper. Pay attention to the edges. Rough edges catch the light wrong and look cheap.
Soft gray wash looks modern. White chalk paint looks coastal.
Soft gray wash looks modern.
Let them dry fully. Then rub a tiny bit of wax or oil into the wood if you stained them. This deepens the color.
Set a tealight on top of each block. Group the three together on a tray or directly on the table.
Light them at dusk and watch the whole corner change. It is the simplest trick in this list and maybe the prettiest.
I move mine around a lot. Coffee table, dining table, bathroom counter. They work everywhere because wood and candlelight go with everything.
Here is a quick guide for picking your finish:
| Finish | Best with | Mood |
|---|---|---|
| Dark walnut stain | Leather and brass | Warm and rich |
| White chalk paint | Linen and light wood | Fresh and airy |
| Gray wash | Concrete and black metal | Modern and calm |
Never leave burning candles alone. Move them away from curtains and little hands.
Distress Thrift Store Frames With Chalk Paint
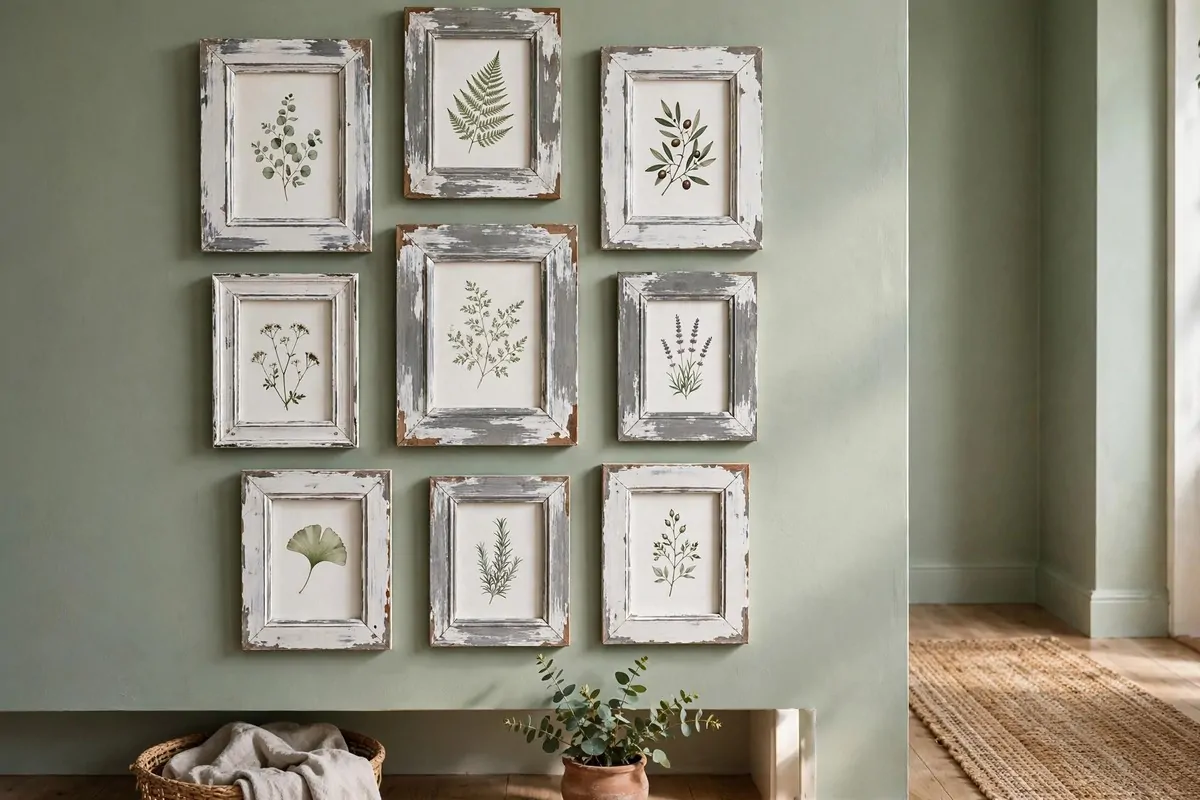
Store-bought frames are fine. But a chalk-painted thrift store frame looks like it came from a boutique home shop. And the flaws are the whole point.
The uglier, the better. This project is very forgiving.
The uglier, the better.
Take out the glass and the backing. You only need the frame itself.
Do not paint it thick. One light coat is enough because you want the old color peeking through.
Do not paint it thick.
The old color shows through in the spots that would wear naturally. Corners, edges, carved bits.
The old color shows through in the spots that would wear naturally.
Wipe off the dust with a dry cloth. Seal with clear wax or matte sealer. This keeps the finish from rubbing off on your hands.
Put your photos or prints back in. The frame now looks old in the best way, like it has a story.
Hang three or four together for a gallery wall. Mixed sizes look better than matching ones. I hung five on my hallway wall and the whole space feels warmer now.
This takes less than thirty minutes per frame, not counting drying. It is a perfect rainy-afternoon project.
My favorite frame was the ugliest gold one. Under the white paint it looks like aged French furniture. My neighbor asked where I bought it and laughed when I told her it was a two-dollar thrift find.
Cover a Cardboard Letter in Floral Fabric
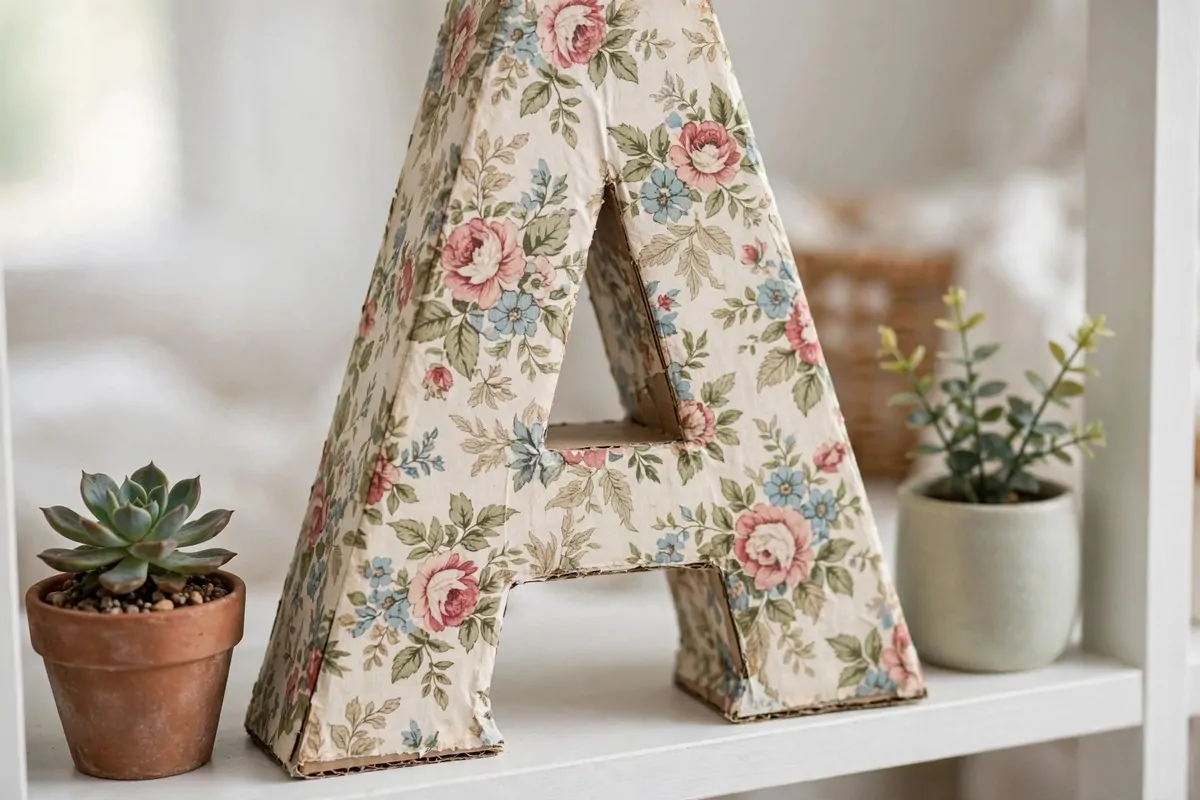
Big fabric monogram letters are everywhere in nurseries and kids rooms. They are also easy to make yourself with a cardboard letter and a pretty fabric.
Buy a cardboard letter from a craft store. Pick the first letter of a name, or a word you love. Mine is an S for Sophie, of course.
The busier the fabric, the less work you need to do. Simple is the right call here.
The busier the fabric, the less work you need to do.
Trace each flat face of the letter onto the back of the fabric. Cut the pieces out with a little extra around the edges. Cut the inside edges and the holes in letters like A as separate strips.
Brush Mod Podge onto one face of the letter. Lay the fabric down and smooth it with your fingers. Work out the bubbles from the center outward.
Fold the extra fabric around the edges and glue it down. Then seal the whole letter with another coat of Mod Podge over the top.
Let it dry standing up. Stand it on a shelf, or hang it on a wall with a small nail.
This looks so sweet in a nursery. A big floral letter over the crib, soft and personal. It also works for weddings, with the couple's initials on the gift table.
I made one for my niece's room in a cherry print. She is six and she tells everyone she made it herself. I let her believe it.
The key is patience with the curves. Take your time wrapping the fabric around tight corners. If a spot wrinkles, it just looks like handmade charm.
Press Gold Thumbtacks Into an Ampersand Canvas
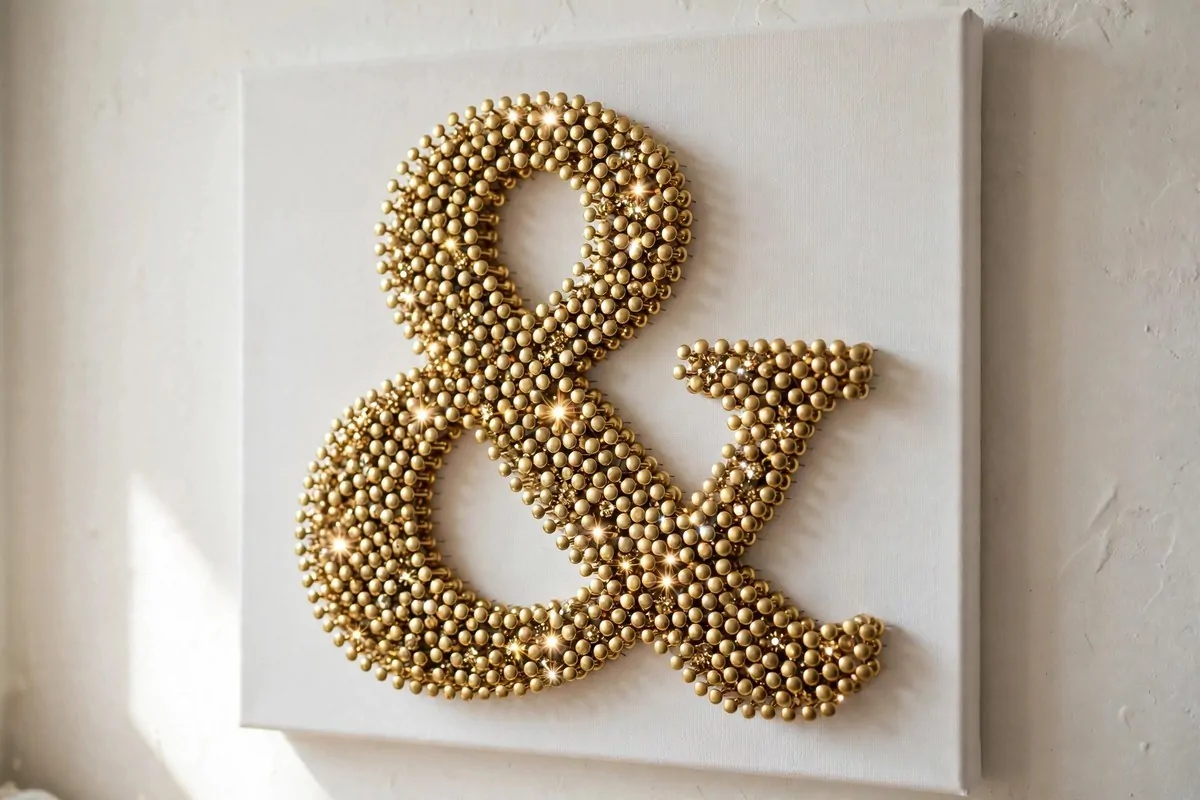
About seven hundred tacks. That is the whole project.
About seven hundred tacks.
Start with a white twelve-inch canvas. Draw the ampersand lightly with a pencil. Print a big ampersand from your computer to trace if your freehand is shaky like mine.
Work inside your outline, row by row. The tacks catch light from a hundred angles, which is why it photographs as texture instead of flat dots.
Work inside your outline, row by row.
Gold tacks look warmer than silver on white. Silver works too, but gold has that cozy glow.
This takes a while. Put on a show and press tacks. It is the kind of slow, simple work that calms your brain.
Hang it in a hallway or bedroom. From across the room it looks like expensive textured art. Up close it is even cooler because you see what it really is.
I love pieces that make people lean in. This one always gets a second look.
You can do any shape you want. A heart, an initial, a star. The ampersand is classic because the curves show off the tack texture best.
Hundreds of tacks are not a toy. Hang it high and enjoy it safely.
Hundreds of tacks are not a toy.
Turn Photo Frames Into a Glowing Vellum Lantern
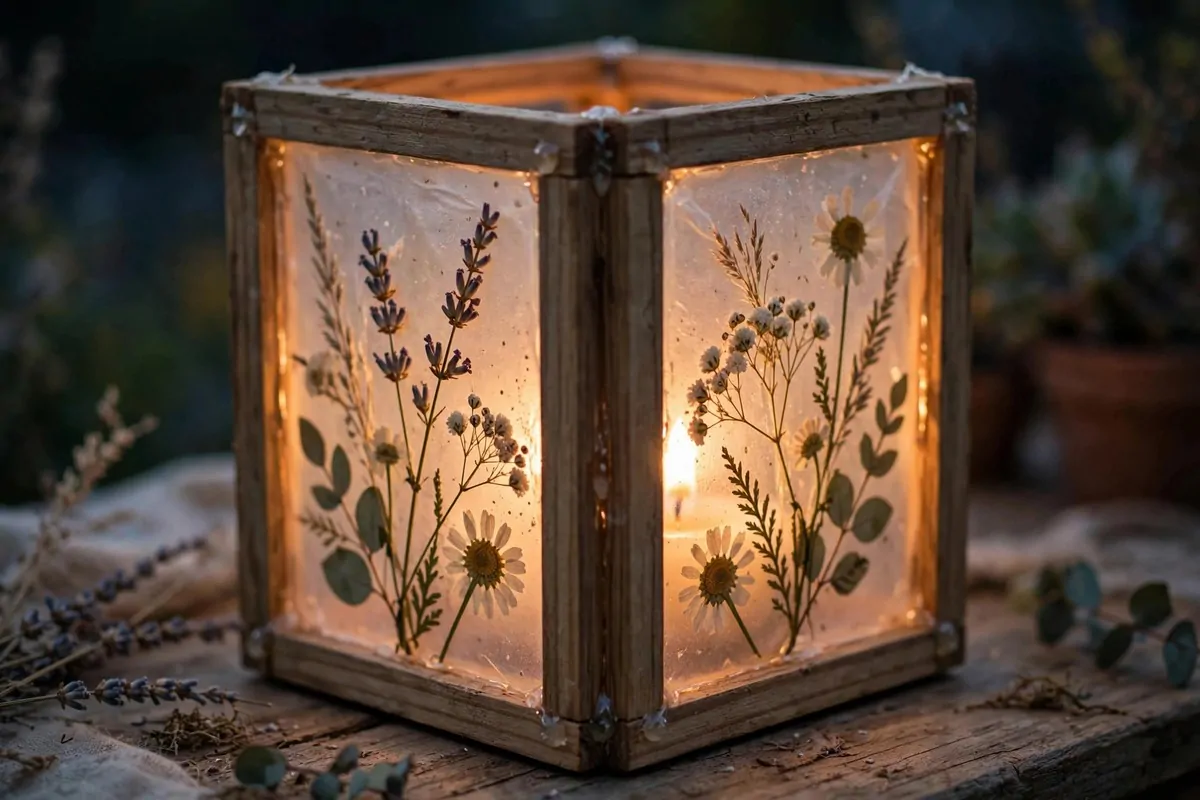
Four cheap photo frames, glued into a lantern, with vellum panels that glow from a candle inside. It looks like something from a home decor catalog.
You need frames with flat square edges, and the little retaining pegs set into the frame itself, not into the cardboard backing. The backings do not get used.
You need frames with flat square edges, and the little retaining pegs set into the frame itself, not into the cardboard backing.
Remove the glass, photos, and backings from all four frames.
Print botanical designs or soft patterns onto vellum paper. Vellum lets light through softly. Regular paper blocks the light.
Cut the vellum to fit each frame. Slide each sheet into a frame where the glass used to be.
Glue the four frames together into a square tower. Hot glue the corners. Hold each corner steady while it sets.
Place a battery candle inside. Real candles get too hot in a small enclosed lantern. Battery ones flicker just as nicely.
Set it on a side table or a mantel at dusk. The printed vellum glows from behind and the whole lantern looks magical.
I keep mine on my entry table. It is the first thing guests see when they walk in, and it makes the whole entrance feel warm.
You can change the vellum with the seasons. Pressed leaves for fall, snowflakes for winter, flowers for spring. One lantern, endless looks.
Knot a One-Knot Macrame Wall Hanging
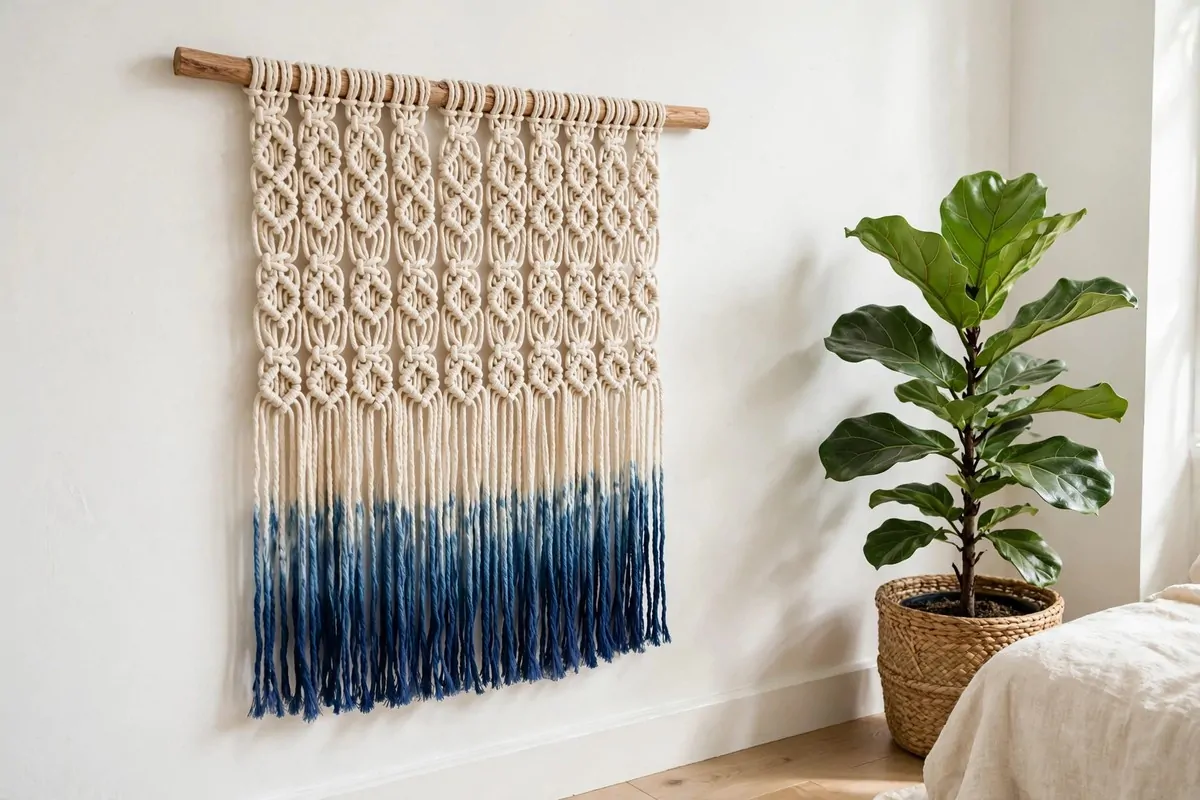
Macrame looks complicated. It is mostly just one knot, repeated. Learn the square knot and you can make this whole wall hanging.
Get cotton macrame cord, three millimeters thick. Cut about twenty long strands, each twice as long as you want the finished piece plus a little extra for the fringe.
Tie a wooden dowel across two chair backs or a door handle. Fold each cord in half and loop it over the dowel with a lark's head knot. This is just folding and pulling through.
That is it. Practice on four cords until your hands remember it.
That is it.
Work the square knot in rows across all your cords. Keep the tension even. Do not pull too tight or the piece curls.
Dip only the bottom fringe section into the dye. Leave the top cream.
Dip only the bottom fringe section into the dye.
Rinse and let it dry flat. Comb the fringe with your fingers or a wide comb.
Trim the fringe into a V shape or a straight line. Sharp scissors matter here. Dull scissors chew the cord.
Hang it on the wall with the dowel resting on two small nails. Step back and admire your knot work.
Then a friend showed me the square knot and I made my first hanging in one afternoon. Now there are three in my house.
Then a friend showed me the square knot and I made my first hanging in one afternoon.
Swag Yarn Over a Hoop For a Soft Chandelier

This yarn chandelier softens a room in a way no store-bought light can. It glows warm, it sways a little, and it costs almost nothing.
Start with a twelve-inch wooden sewing hoop or embroidery hoop. Wrap the inner hoop with double-sided tape. This stops the yarn from sliding as you work.
Pick three yarn colors that go together. Cream, mustard, and a soft teal is a lovely combo. Use chunky yarn for a fuller look.
Loop the yarn around the hoop in long swags. Drape it across and let it hang down in long curves underneath.
Keep the loops uneven in length.
Even loops look flat. Uneven loops make a pretty scalloped shape.
Use a pendant light cord kit from the hardware store. They are simple to wire.
Use a pendant light cord kit from the hardware store.
Hang the whole thing from the ceiling where the cord kit allows. Over a reading chair or a dining table works great.
Screw in a warm LED bulb. The yarn softens the light instead of blocking it. The room glows instead of glaring.
I have one over my reading corner and it is my favorite spot in the house at night. The light feels like a hug.
Use LED only, never old-style bulbs that get hot. Check the cord kit's weight rating too.
Use LED only, never old-style bulbs that get hot.
Wrap a Hula Hoop in Fairy Lights
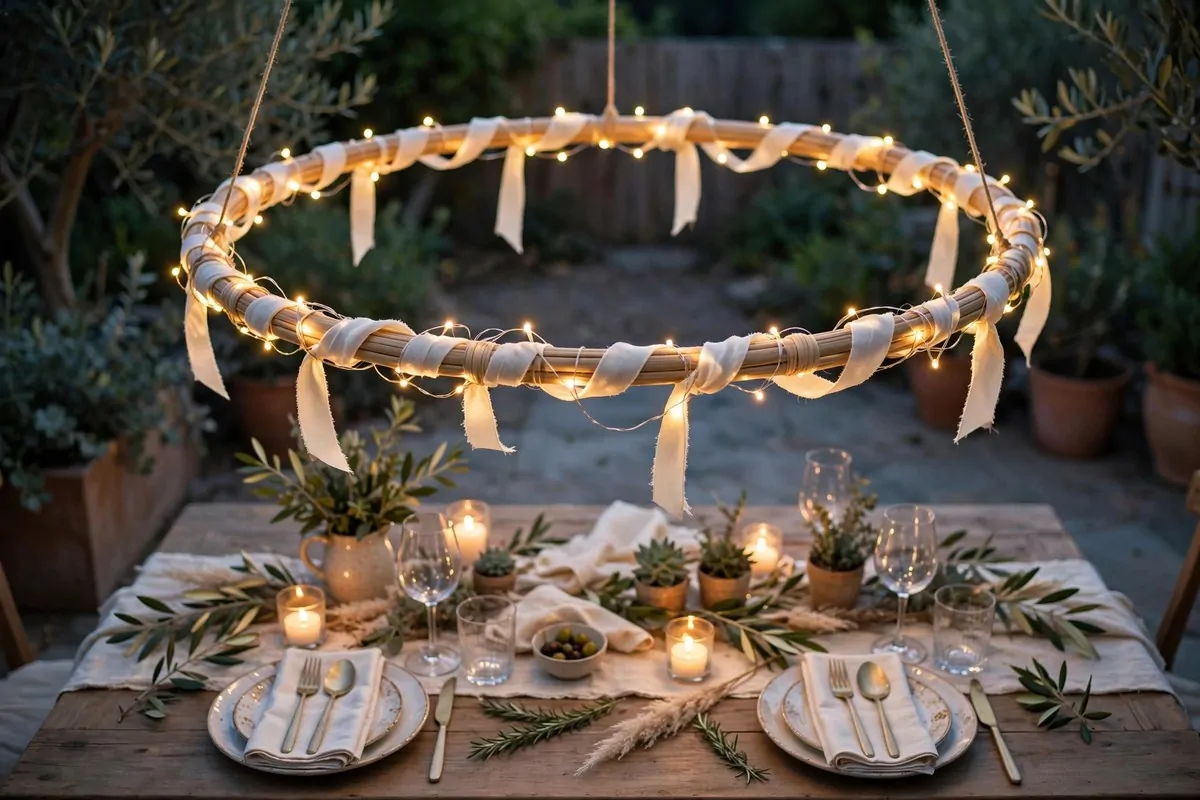
A hula hoop, some ribbon, and a string of fairy lights. That is a chandelier. It sounds like a joke until you see it glowing over a dinner table.
This matters more than it sounds. The wrap hides the plastic and gives the lights something to grip.
This matters more than it sounds.
Drape fairy lights around and across the hoop until the whole ring glows. Use the lights from your holiday box. Battery ones are easiest because there is no cord to hide.
Hang it flat from the ceiling with clear fishing line or thin wire. Hang it low over a table, not high like a real chandelier. Low and glowy is the look.
This is the project that shows up at every pretty wedding and porch party you have ever admired. Now you know the secret.
I made one for a backyard dinner last summer. When the sun went down, everyone moved their chairs closer to that table. Light does that to people.
Take it down in bad weather if it is outside. Fairy lights are tough but the hoop wrap is not waterproof.
For indoors, hang one in a kid's bedroom. It makes the best nightlight in the world. Soft, starry, and magic.
The whole thing costs less than a pizza. And it will get more compliments than anything else you own. I promise.
Turn Old Book Pages Into a Flower Topiary
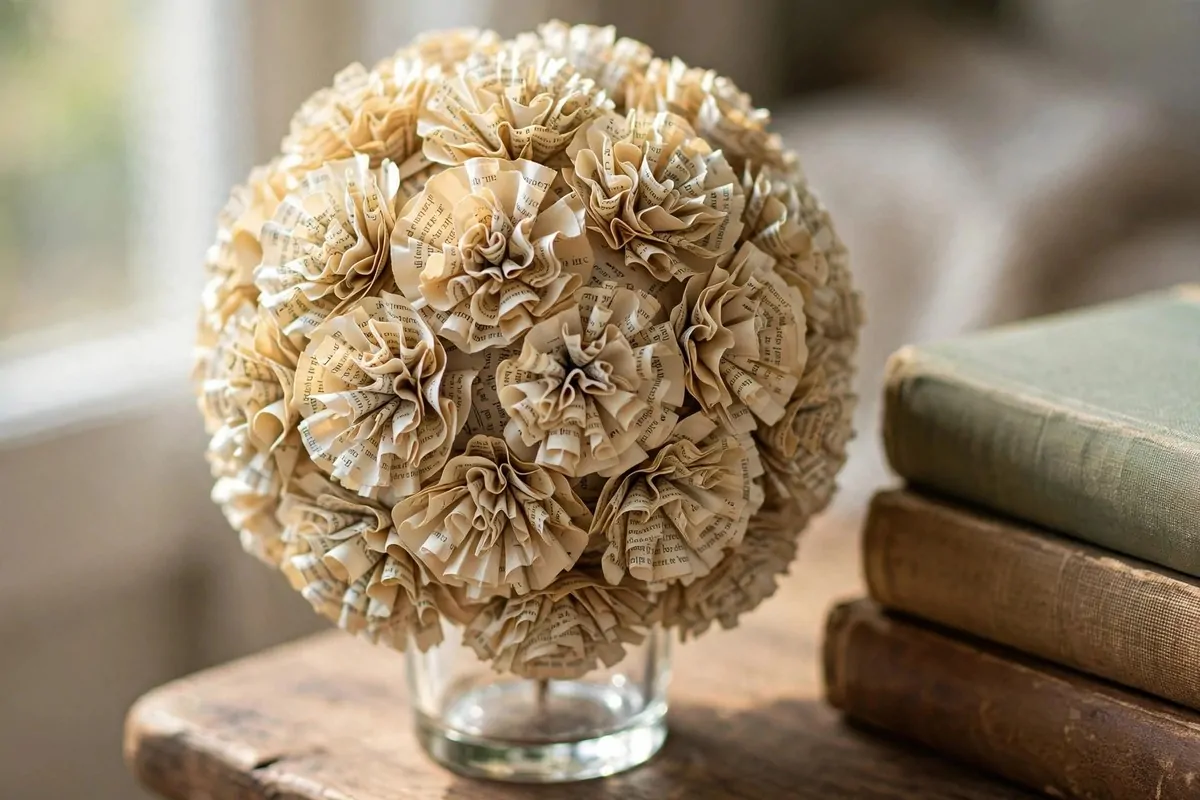
One old book, one foam ball, and a quiet afternoon. That is all it takes to make a paper flower topiary that looks like a boutique centerpiece.
Get a charity shop paperback you do not mind cutting up. Old novels with yellowed pages look best. The aged color adds charm.
Cut the pages into long strips with a paper trimmer. Even strips make even flowers. Then cut each strip with pinking shears for a ruffled edge.
Run a stamp pad lightly along the cut edges if you want a darker aged look. This tiny step makes a big difference.
Ruffle each strip and pin or glue it onto a four-inch foam ball. Cover the whole ball, overlapping as you go. It should look like a ball of petals when you are done.
Push a wooden dowel into the bottom of the ball as a stem. Set the stem into a small heavy candle holder or a tiny pot filled with pebbles.
Place it on a mantel, a side table, or a bookshelf. It looks delicate and expensive.
I made three of these for my sister's baby shower in different sizes. They looked like real floral arrangements in the photos. Nobody guessed paper.
Keep it dry and out of direct sun. Paper fades and foam balls do not like water.
This project uses up books nobody wants anymore. It feels good to give them a second life instead of throwing them away.
Stack Bowls Into a Tiered Succulent Planter
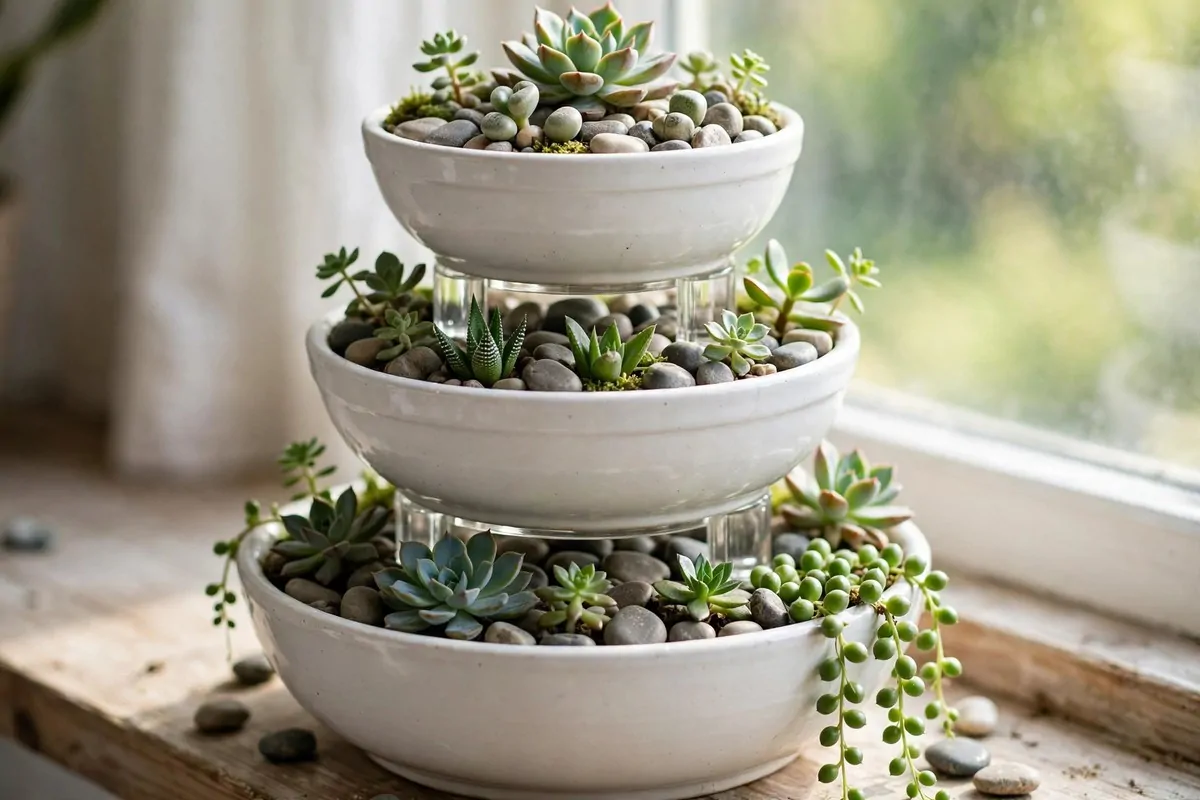
Three bowls, two glasses, and some succulents. Stacked and glued, they become a tiered planter that looks like a designer piece.
Pick three white ceramic bowls in decreasing sizes. Thrift stores are full of them. Make sure the openings are wide enough to plant in.
You do not need to paint them. The plants and stones cover them completely once it is filled.
You do not need to paint them.
Glue a glass upside down in the center of the biggest bowl. Set the middle bowl on top of it. Repeat with the second glass and the smallest bowl on top.
Sit the stack slightly off-center. A little crooked looks grown and natural. Perfectly centered looks engineered.
Fill each bowl with a layer of pebbles first. Succulents want dry roots and there is no drainage hole anywhere in this stack. The pebbles are your drainage.
Add cactus soil on top of the pebbles. Plant small succulents in each tier. Tuck in a few river stones for decoration.
Water very lightly. A spoonful per bowl is plenty. Succulents store water in their leaves, so less is more.
Mine did, until my cat knocked it over. Glue it well and keep it away from cats.
Mine did, until my cat knocked it over.
This planter costs almost nothing if you thrift the bowls. And it looks like the kind of thing that sells for good money in a garden shop.
Line Plain Bins With Pretty Fabric
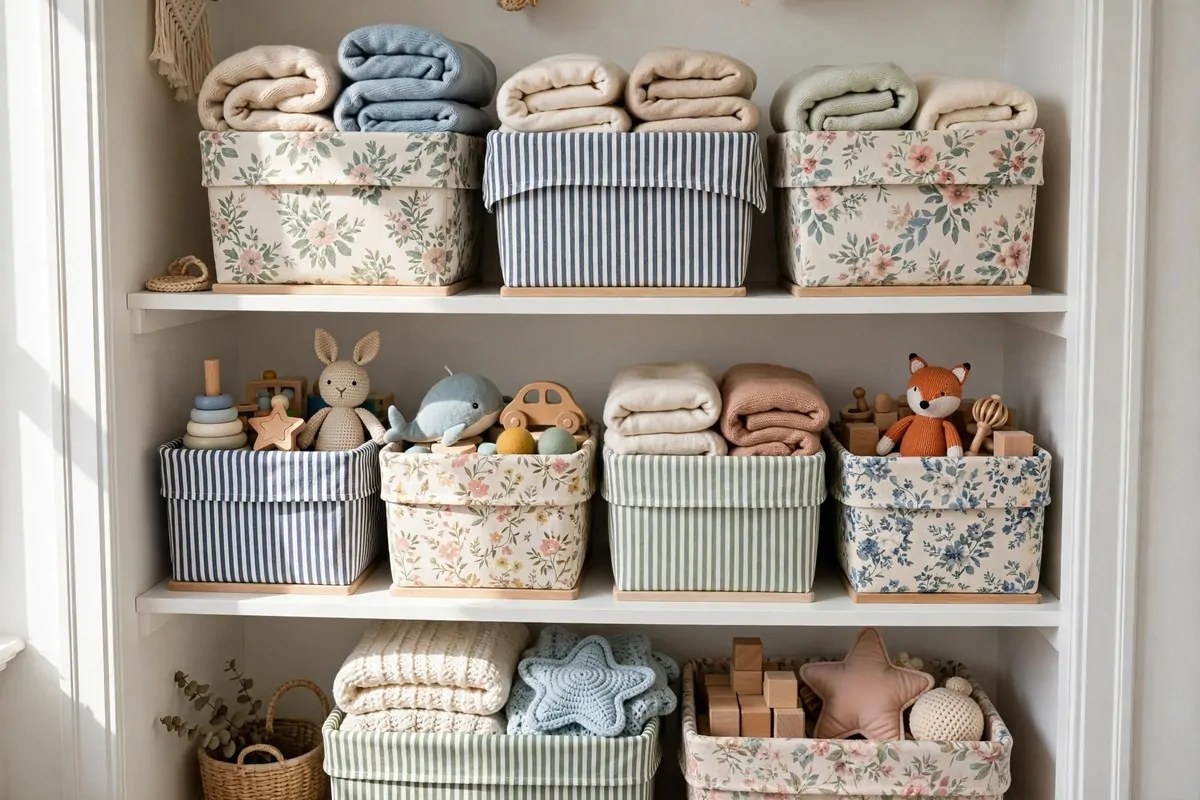
Plastic storage bins are useful but ugly. Fabric changes everything. Lined bins look like custom storage from an organizing store.
Measure the inside of each bin. Cut your fabric to fit, leaving extra to fold over the top edge.
Measure the inside of each bin.
Pick a fabric you love. Stripes, florals, or a simple linen all work. This is your chance to add color to a shelf.
Use hot glue or spray adhesive to stick the fabric to the inside walls. Smooth it down as you go. Fold the extra over the top edge and glue it down on the outside.
Let the glue set fully before you load the bins. Hot glue needs about ten minutes. Spray adhesive needs longer.
Line up your finished bins on a shelf. Suddenly your closet looks organized and pretty at the same time.
I did this in my craft closet with a cherry print fabric. Opening that closet used to stress me out. Now it makes me happy.
Here are some fabric picks for different rooms:
- Kids room: bright polka dots or animals
- Bedroom closet: soft stripes or calm linen
- Bathroom: small geometric prints that hide water spots
- Living room shelves: classic ticking stripe or buffalo check
The bins still work as hard as before. They just look better doing it.
Wipe the fabric with a damp cloth if it gets dusty. The glue holds up fine to light cleaning.
Frame Gift Wrap As Oversized Wall Art
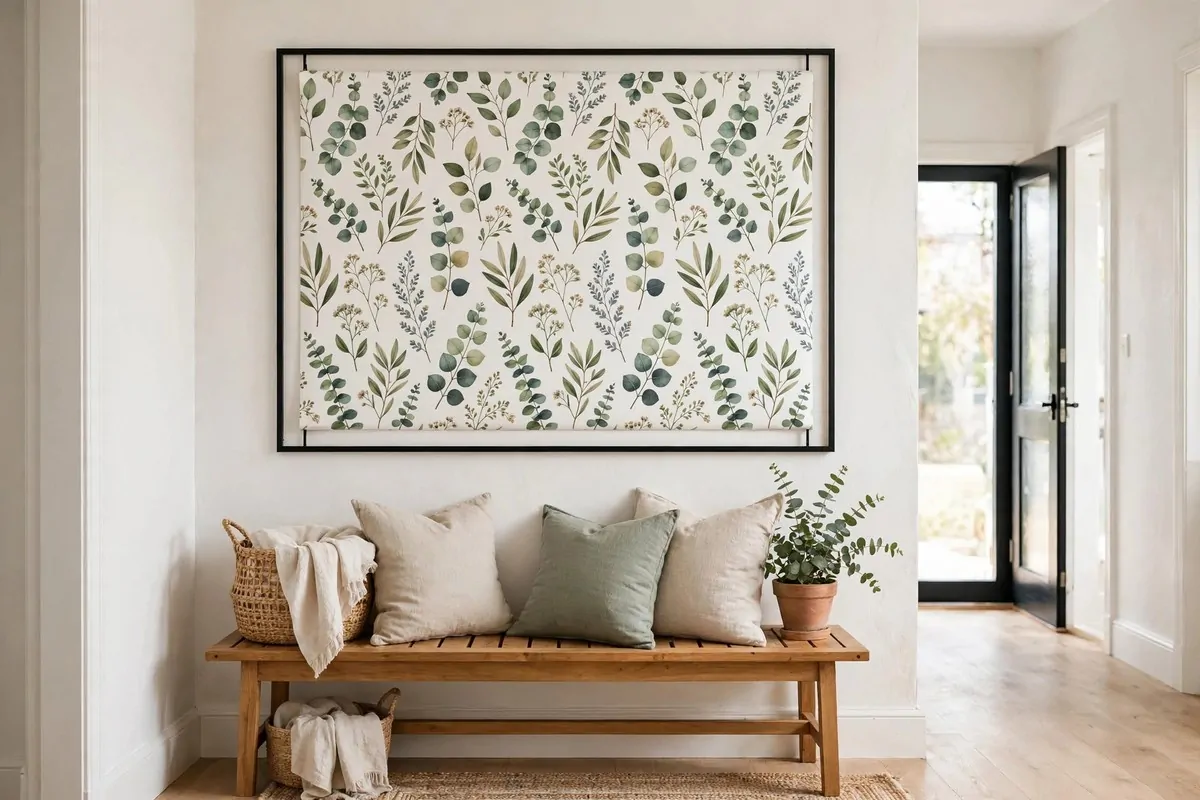
This might be the cheapest project on the whole list. A roll of pretty gift wrap and a big frame. That is oversized wall art for the price of lunch.
Gift wrap has beautiful patterns now. Botanicals, abstract shapes, vintage maps.
Gift wrap has beautiful patterns now.
Buy the biggest thin frame you can find. Thrift stores often have huge frames with ugly prints inside. You only need the frame.
Cut your gift wrap or a large sheet of premium paper to fit. Smooth it behind the glass. Make sure it sits flat with no wrinkles.
Hang it on a blank wall. One big framed piece has more impact than five small ones. It makes the whole wall feel designed.
I framed an old-style world map in my hallway. Guests always stop to look at it. It cost me less than a coffee.
Swap the paper with the seasons if you want. Floral for spring, dark botanical for fall. The frame stays, the art changes.
Pro tip. Iron the paper on low heat if it comes curled from the roll. Flat paper looks ten times better behind glass.
This is also perfect for renters. One big frame, no drilling a dozen holes. Lean it on a mantel if you cannot hang it.
Tape Off Geometric Abstract Art on Canvas
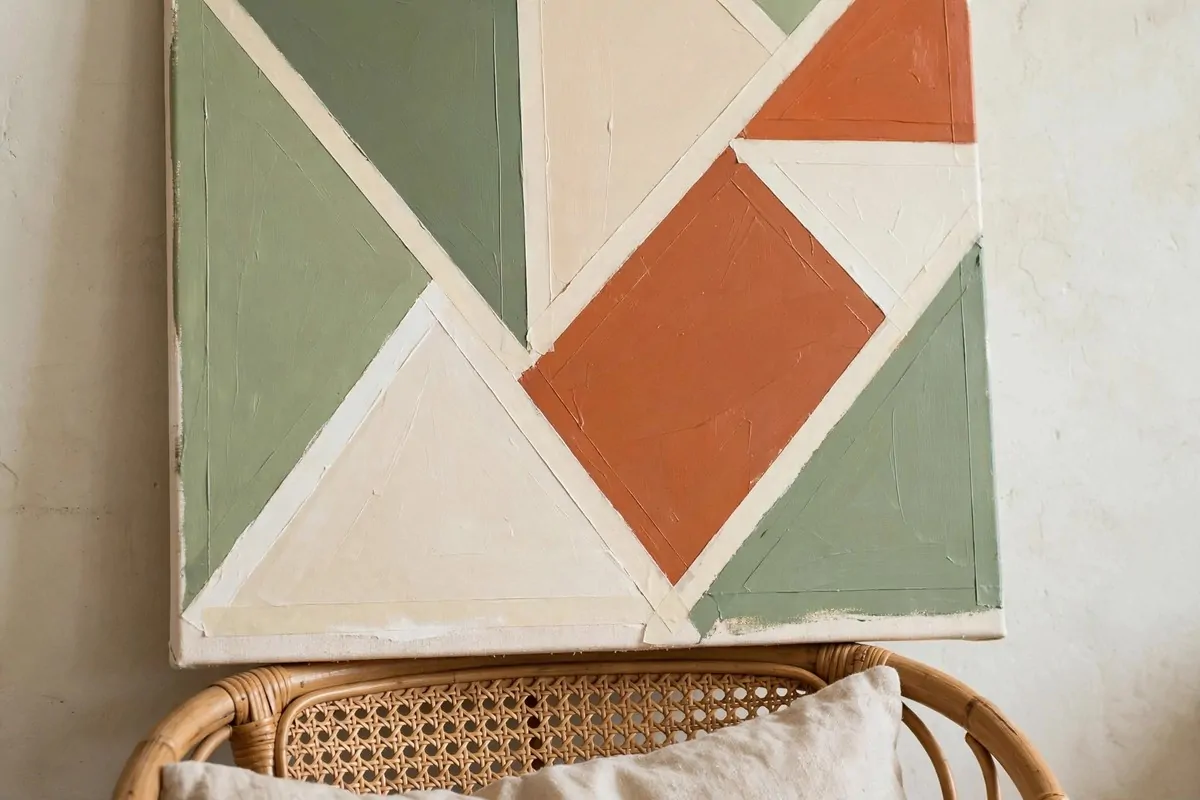
You do not need to be an artist. You need painter's tape, three paint colors, and a little patience.
Get a blank canvas. A medium size is good to start. You can always go bigger later.
Triangles, stripes, big blocks. Press the tape edges down firmly so paint does not bleed under.
Triangles, stripes, big blocks.
Paint each section a different color. Sage green, terracotta, and cream is a combo that always looks good. Two coats per section.
Peel the tape off while the paint is still slightly tacky. This gives you the crispest lines. Pull slowly at an angle.
Touch up any bleeds with a small brush. Nobody will notice tiny flaws. Abstract art is forgiving.
Group two or three small canvases together for a gallery look. Or let one big canvas stand alone.
That is the real luxury of DIY. Custom colors for your exact room.
That is the real luxury of DIY.
Frame them in thin floating frames if you want extra polish. Unframed canvases look modern too.
This project is great with kids. Let them tape and paint their own. Their art looks genuinely cool in this style.
Sew a No-Zip Envelope Pillow Cover
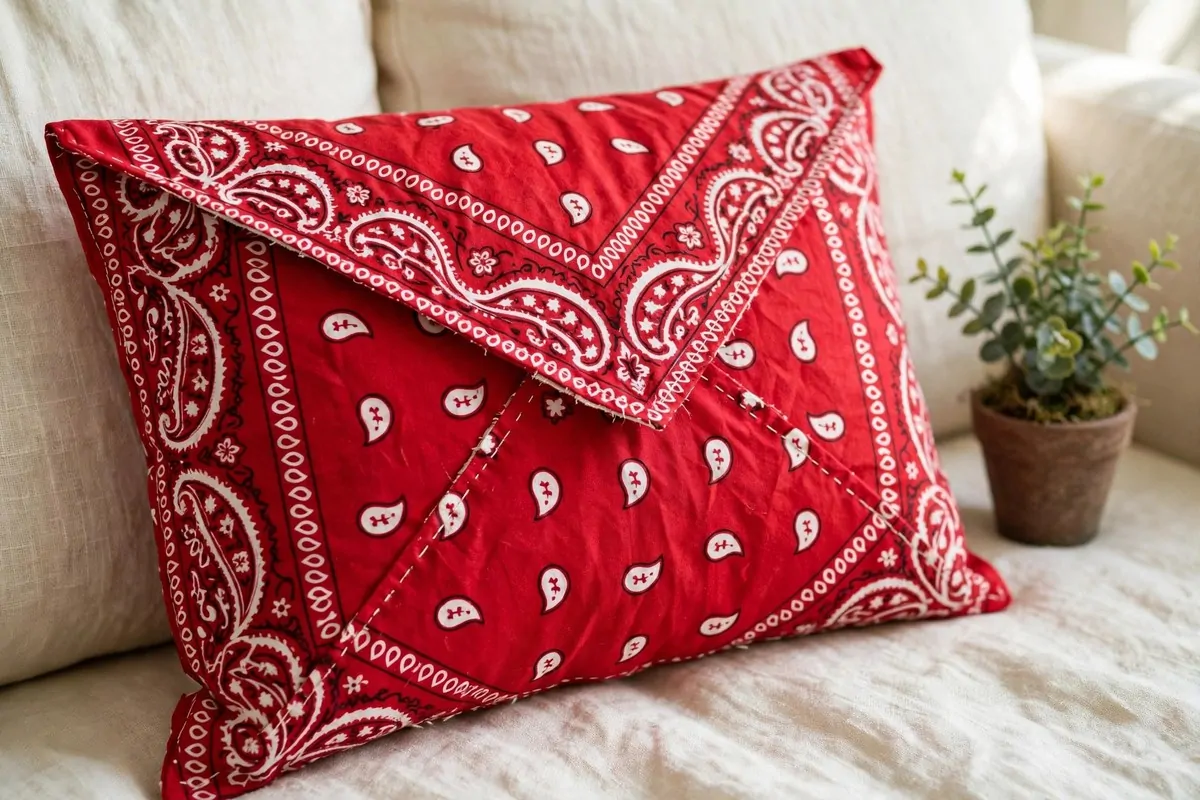
Throw pillows are the fastest way to change a room. And envelope pillow covers are the fastest way to make throw pillows. No zipper, no buttons, no stress.
You do not even need a sewing machine. Fabric glue or iron-on hem tape works too. But a machine makes it quicker.
Measure your pillow insert. Cut one square of fabric for the front, the exact size of the pillow plus one inch all around for seams.
Cut two rectangles for the back. Each one should be the full width, and about two-thirds of the height. These overlap to make the envelope opening.
Hem one long edge of each back piece. This is the edge that will show in the opening.
Lay the front piece right-side up. Lay the two back pieces right-side down on top, overlapping in the middle. Pin the edges.
Sew all four sides with a half-inch seam. Turn it right-side out through the envelope opening. Push out the corners with a pencil.
Stuff your pillow insert in through the back opening. Fluff it up.
A bandana makes a perfect pillow cover. The print is already pretty and the size is about right for a standard pillow. I made mine from a red bandana and it is my favorite pillow on the sofa.
Change your covers with the seasons. It takes ten minutes and the whole room feels new.
Wash the covers like normal fabric. Take the insert out first.
Build Magnetic Wooden Poster Hangers
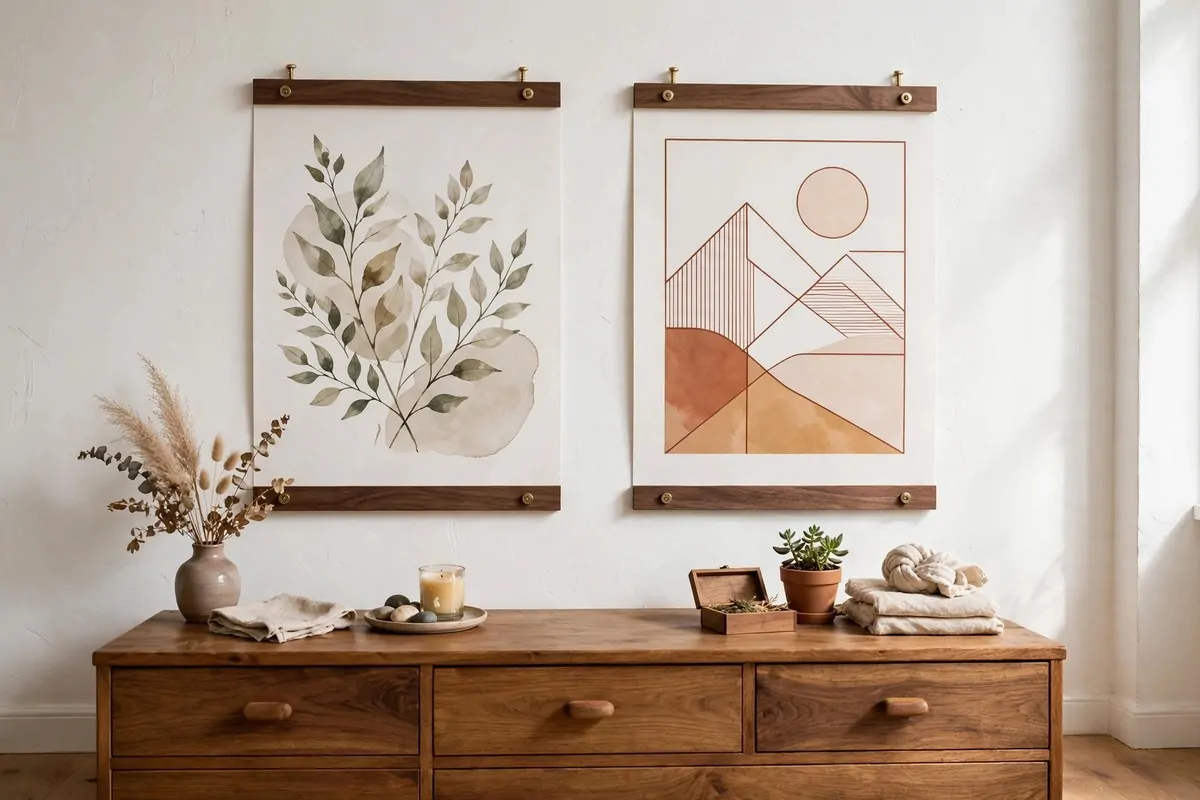
Framing big posters is expensive. Magnetic wooden hangers cost almost nothing and look just as clean. They are also the easiest thing to swap when you change your mind.
Get two thin wooden strips for the top and two for the bottom. Craft stores sell basswood strips. Cut them a little wider than your poster.
Sand the strips smooth. Stain them walnut or paint them black. The wood is the frame here, so make it pretty.
Glue small strong magnets to the inside faces of each strip pair. Two or three magnets per strip is enough. They need to grip through the paper.
Do the same at the bottom. The bottom strips act as a weight so the poster hangs flat.
Do the same at the bottom.
Tie a string or leather cord to the top strips for hanging. A small brass screw in each end gives you something to tie to.
Hang it on one nail. That is it.
I use these for all my art prints now. When I get tired of one, I slide it out and slide a new one in. No glass, no backing, no hassle.
This also works for kids' artwork. Hang their best drawings like gallery pieces. They will be so proud.
The magnets must be strong enough for thick paper. Test with your heaviest poster before you hang it for real.
Turn a Fishbowl Into a Glowing Table Globe

A round glass fishbowl, a wood slice, and a candle. Put together, they make a glowing globe that looks like a boutique holiday piece.
Start with a round glass fishbowl or globe vase. The kind sold for betta fish. Clean it well.
Get a raw wood slice for the base. A thick branch slice about an inch thick works. It should be a little wider than the bowl.
Set a battery pillar candle in the center of the wood slice. Battery only. Real flames and enclosed glass are a bad mix.
Tuck soft pine sprigs around the candle inside the bowl. Add a few small ornaments or pinecones. Red berries look festive.
Place the fishbowl upside down over everything, resting on the wood slice. Tie a ribbon bow around the neck of the bowl.
Turn on the candle at dusk. The glass glows softly and the decorations inside look magical.
I made a winter version with red ornaments and a plaid bow. It sat on my dining table all season and everyone asked about it.
Change the inside with the seasons. Dried flowers for spring, sand and shells for summer. The globe stays, the scene changes.
This is also a lovely centerpiece for a dinner party. It is low enough that people can talk over it, and the glow makes everyone look good.
Marble-Dip Jars For a Designer Candle Set
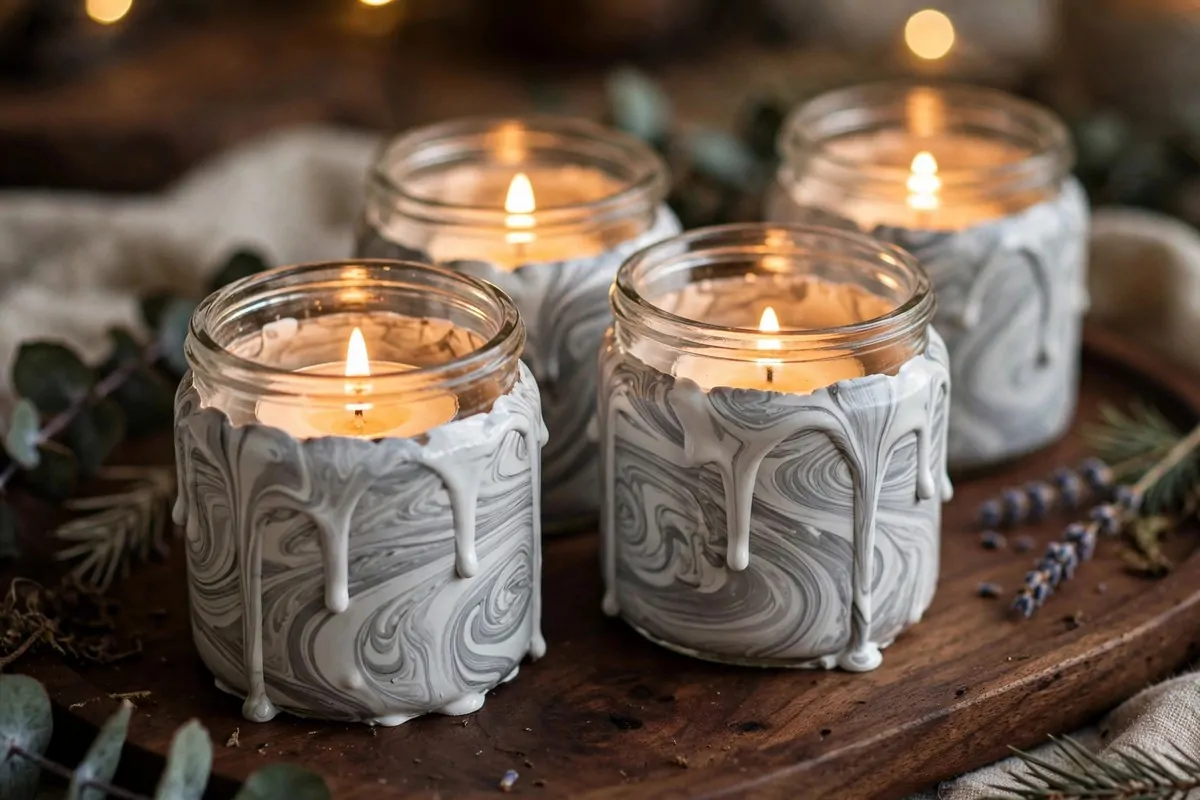
This trick feels like a magic show. Swirl nail polish in water, dip a jar, and pull out a marble pattern that looks like expensive stone.
Fill a disposable container with room-temperature water. It needs to be deep enough to dip your jar sideways.
Drop a few drops of nail polish onto the water surface. Use two or three colors. White and gray make a classic marble look.
Swirl the colors gently with a toothpick. Do not overmix. You want ribbons of color, not mud.
Dip a small clean glass jar sideways through the polish film. Roll it slowly. The polish wraps around the glass in a marble pattern.
Pull it out and set it upside down on paper to dry. Do not touch the wet polish. It smudges easily.
Work fast. Nail polish skins over in the water within a minute or two. If it does, scoop it out and start fresh.
Repeat with matching jars in the same colors. A set of three looks intentional and luxe.
Drop tealights inside. The marble pattern glows softly around the flame.
I made a set in white and gold for my bathroom. They look like something from a spa. My total cost was one bottle of nail polish I already owned.
Do this outside or near an open window. The fumes are strong. And wear gloves unless you want marbled fingers for a week.
Stack Old Books Into a Charming Side Table
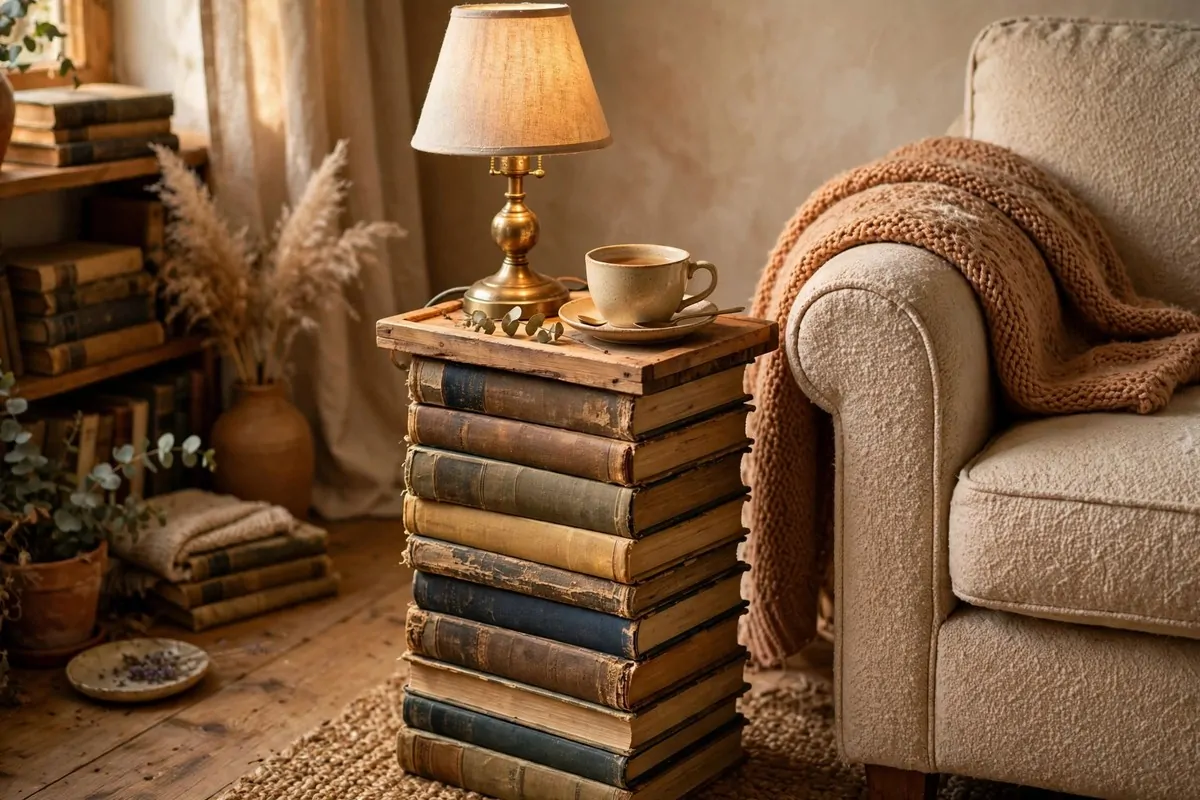
A stack of old hardcover books makes the most charming side table. It is sturdy, it is full of character, and it costs nothing if you raid a thrift store.
Gather ten to fifteen hardcover books. Similar sizes stack best. Old encyclopedias are perfect because they are thick and uniform.
Stack them with the spines facing out, alternating directions slightly. This makes the tower stable. Press down firmly as you go.
Glue the books together if you want it permanent. A line of strong craft glue between each book does the job. Or leave them loose so you can still read them.
Top the stack with a small wooden tray or a square of plywood. This gives you a flat surface for a lamp or a cup.
Place it beside an armchair with a small lamp on top. It is the perfect reading corner table.
I built mine from old cookbooks and novels. The spines show off their colors and it looks like a little sculpture.
This table is heavier than it looks. Books are dense. Make sure your floor can handle it, and keep it away from wobbly spots.
If you want it taller, add more books. If you want it shorter, take some away. It is the most adjustable table you will ever own.
Dust it now and then. Books collect dust on their top edges. A quick wipe keeps it looking sharp.
Press Leaves Between Two Panes of Glass
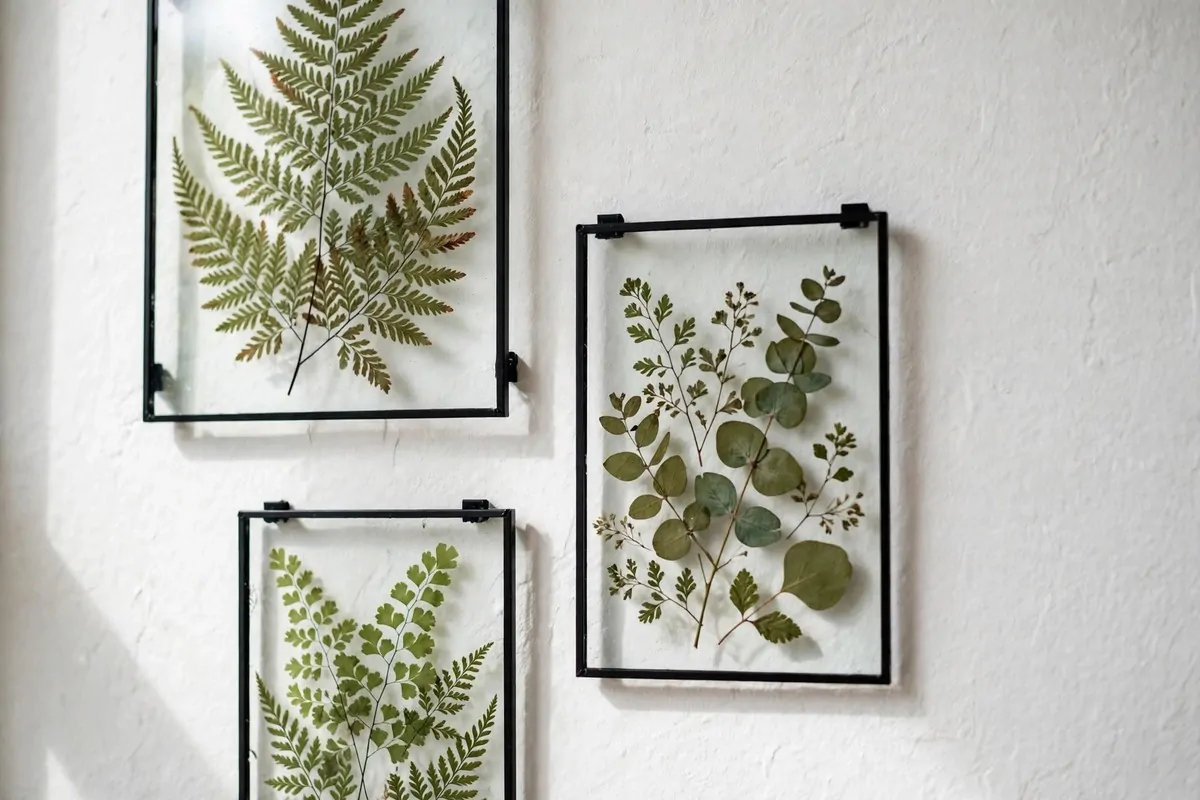
Pressed botanicals in floating frames look like they came from a museum shop. You can make them on a walk with a bag for leaves.
Pick flat leaves and ferns. Press them between heavy books for a week or two. Put paper towels above and below to absorb moisture.
Get floating frames. These are two panes of glass in a thin frame. They hold the leaf between them so it looks like it is floating.
Arrange your pressed leaves on one pane of glass. Keep the design simple. One big leaf beats ten small ones.
Close the frame. The glass holds everything flat and protects it from dust.
Hang a group of three on a white wall. Same frame size, different leaves. It looks like a real herbarium collection.
I pressed leaves from a park near my house. Now that walk lives on my hallway wall. It is my favorite kind of souvenir because it cost nothing.
Keep them out of direct sun. Pressed leaves fade over time in strong light. A hallway or a shaded wall is perfect.
You can also press flowers. Flat ones like pansies and daisies work best. Thick roses do not press well.
Change them with the seasons if you like. Spring blossoms, summer ferns, fall maple leaves. Nature gives you new art for free.
Braid Old Jeans Into a Rugged Rag Rug
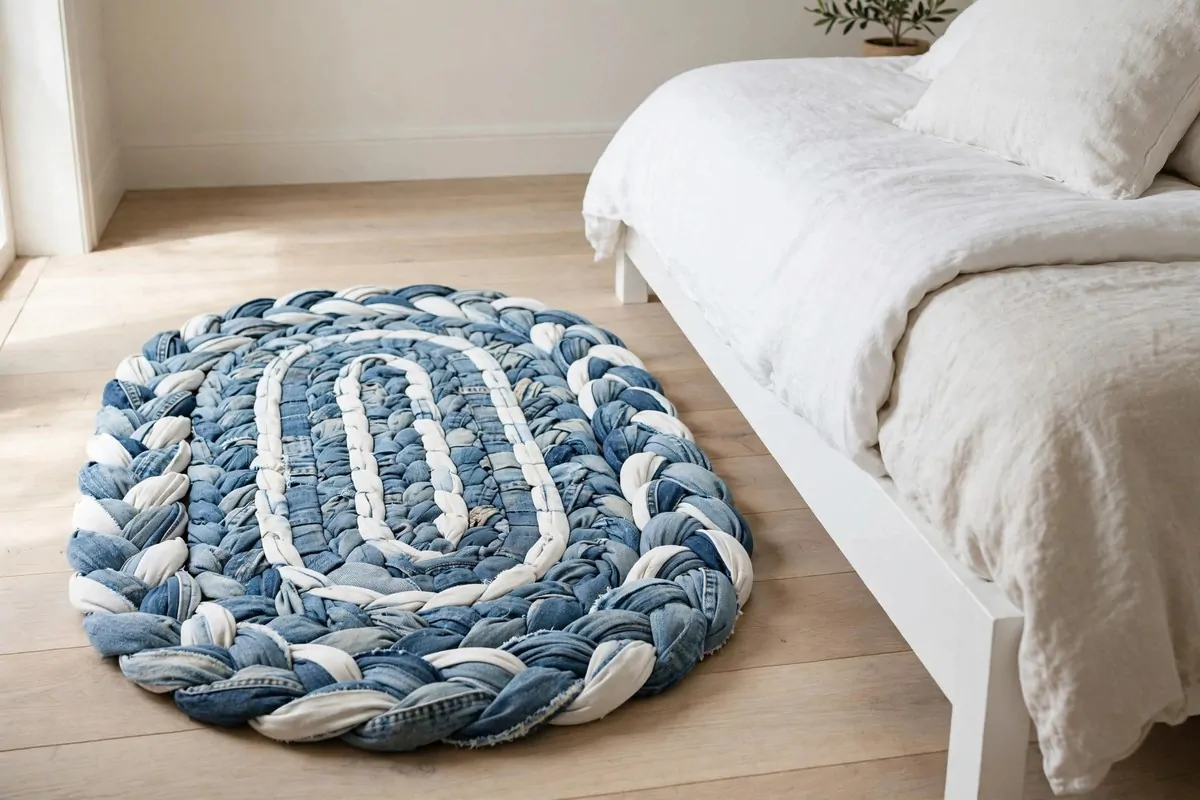
Old jeans make the toughest, prettiest rag rugs. Denim is strong, the blue fades beautifully, and you probably have a pile of worn-out pairs already.
You need a lot of strips. Save up jeans for a few weeks or ask friends.
You need a lot of strips.
Sew or knot the strips end to end into three long ropes. Three ropes, one for each braid strand.
Pin the three ropes together at one end. Braid them tightly, the way you braid hair. Keep the tension even so the rug lies flat.
This is the slow part. Put on music.
This is the slow part.
Keep coiling and sewing until the rug is the size you want. A small bedside rug takes an afternoon. A big one takes a weekend.
The faded blue denim looks amazing on light wood floors. It is soft underfoot and it gets better with age.
I made a small oval one for beside my bed. My feet hit soft denim every morning instead of cold floor. It is one of those small luxuries that costs nothing.
Wash it like jeans. Cold water, hang dry. It will last for years because denim is nearly indestructible.
If braiding a whole rug feels like too much, start with a small round one for a chair or a pet bed. Same steps, smaller commitment.