How to Organize Digital Photos

Last spring, I wanted to find one photo. My dad holding my son on the day he was born. I knew it was in my phone. I scrolled for 25 minutes. Past screenshots of bus times. Past 40 photos of a sunset. Past blurry shots of my own pocket.
I found it in the end. But I felt a bit sad. That photo is one of the most important things I own. And it was buried under thousands of pictures I did not care about at all.
We take so many photos now. Rise Above Research, a firm that tracks the photo industry, estimated that people around the world would take about 1.9 trillion photos in 2025. Most of those are on phones.
That is great in one way. We can capture so much. But it also means our best memories get lost in a pile of junk.
The fix is not to sort every single photo into a perfect album. That would take forever. The fix is a simple flow: delete what you don’t need, sort what is left in a light way, archive the old stuff safely, and keep it tidy with a few minutes a month.
That is what this post will walk you through. Delete. Classify. Archive. Maintain.
Why Your Camera Roll Keeps Growing Out of Control
Your camera roll grows because taking a photo costs nothing. No film. No prints. Just a tap.
So we take ten shots when one would do. We take photos of things we want to remember, like a parking spot or a price tag. We save memes and screenshots. Apps save images into our camera roll without asking.
And we almost never delete. Deleting feels like work. And a bit scary, too. “What if I need it?”
There is also an odd thing about photos and memory. In a 2014 study, Linda Henkel at Fairfield University had people tour a museum. When they took photos of objects, they remembered fewer of those objects and fewer details than when they just looked. She called it the photo taking impairment effect. It seems we let the camera do the remembering for us.
So we take more photos to remember, and then we can’t find them. That is the loop we want to break.
Start With the Photos You Definitely Don’t Need
This is the delete step. And it is easier than you think, because a lot of your photos are easy calls.
Start with the no brainers. These can go without a second thought:
- Blurry or dark photos
- Photos of the floor, your pocket, or your thumb
- Photos of parking spots, once you have left
- Photos of price tags and menus, once you are done with them
- Memes you saved and never looked at again
- Photos sent in group chats that saved to your roll on their own
Don’t try to do all of your years at once. Start with the last month. Scroll fast, and tap delete on anything from the list above. It should take five to ten minutes.
A small safety net helps here. On iPhone, deleted photos go to the Recently Deleted album and stay there for 30 days. In Google Photos, backed up photos stay in the trash for 60 days. So if you delete by mistake, you have time to get it back.
Once you have done the last month, do the month before. Then the one before that. Small bits, not one big push.
Deal With Screenshots Before They Become Permanent Clutter
Screenshots are their own kind of mess. We take them for a reason in the moment. A ticket. A recipe. A text from a friend. A map. Then we forget them forever.
Both big photo apps can show you all your screenshots in one place. On iPhone, look under Media Types for Screenshots. In Google Photos, look in your device folders for the Screenshots folder.
Open that view and go through them fast. For each one, ask:
- Do I still need this? If not, delete it. Most will go.
- Is it info I will need again? Like a WiFi code or a booking number. Copy the info into a note, then delete the screenshot.
- Is it a memory? Like a sweet text from your mom. Keep it, and add it to a “Saved Texts” album.
Google Photos also lets you stop backing up the Screenshots folder, so they stay on your phone and don’t fill up your cloud. You can find that in the backup settings under device folders. It is a nice way to keep junk out of your long term library.
My new rule: if I take a screenshot for a task, I delete it as soon as the task is done. It takes one second, and it saves so much cleanup later.
Separate Memories From Useful Reference Images
Now the classify step. Not every photo you keep is a memory. Some are just info. And they need to live in different places.
Memories are photos of people, places, and moments you care about. Birthdays. Trips. Your kid’s first steps. Your dog being silly.
Reference images are photos you keep for info. A photo of your car’s tire size. A receipt. A whiteboard from a meeting. A label on a medicine box.
When these mix, your memories get buried under tire sizes. So I split them.
| Type | Examples | Where It Goes |
|---|---|---|
| Memory | Family, trips, pets, big days | Main photo library |
| Reference | Receipts, labels, notes, serial numbers | A “Reference” album, or a notes app |
| Document | ID cards, insurance, forms | A safe folder in your files or cloud drive |
| Junk | Blurry, used up, no longer needed | Trash |
For reference photos, I like to move them out of my photos app and into a notes app. In a note, I can add a title like “Car tire size” and find it with search in two seconds.
In Google Photos, there is also an Archive feature. It hides a photo from your main view without deleting it. That is a good home for receipts and reference shots you want to keep but not see every day.
What to Do With Hundreds of Nearly Identical Pictures
We all do this. Ten shots of the same group photo, so at least one has everyone’s eyes open. Twenty shots of a sunset that all look the same. Burst mode at a kid’s football game.
These near copies are some of the biggest space hogs in a photo library.
Here is my quick way to handle them:
- Look at the set as a group. Open them side by side, or scroll through them fast.
- Pick the best one or two. Clear faces, good light, no blur.
- Mark it as a favorite. A heart or star makes it easy to find later.
- Delete the rest. Don’t think too hard. If you can’t tell them apart, neither will anyone else.
Your phone can help with exact copies too. On iPhone, the Photos app has a Duplicates album under Utilities. It finds exact and near exact copies and lets you merge them. Apple says merging keeps the best quality version and puts the rest in Recently Deleted.
For burst shots, open the burst and pick the frames you want. The phone will offer to remove the others.
Build Albums Around How You Remember Things
Albums can be great, or they can be a big waste of time. It depends on how you make them.
Think about how you look for a photo. You don’t think, “It was image 4,812.” You think, “It was at my sister’s wedding,” or “It was the summer we went to the lake,” or “It was when the baby was tiny.”
So build albums around those memory hooks:
- Big events: weddings, birthdays, graduations.
- Trips: one album per trip, with the place and year in the name.
- People: one album for each kid, or each close family member.
- Years: a “Best of 2026” album with your top 50 photos from the year.
You don’t need albums for everything. Both Apple Photos and Google Photos can already search by face, place, and thing. Type “beach” or “dog,” and they find them for you. So save your albums for the stuff search can’t figure out, like “the day we got the keys to our house.”
My favorite album is the “Best of the Year” one. Each December, I pick my top photos. It takes an hour, and it turns a pile of thousands into a small, sweet story of the year.
Create a Home for Important Photos and Documents
Some photos are not memories or junk. They are important. A photo of your passport. Your health card. Your car title. A signed lease.
These should not sit in your camera roll. If your phone is lost or someone picks it up, they can be seen. And they are hard to find in a sea of selfies.
Here is what I do instead:
- Scan them with a scanner app or the notes app. This makes a clean PDF, not a tilted photo.
- Give each one a clear name. Like “Passport Ahmed 2026.pdf.”
- Save them in one safe folder in your cloud drive, with a strong password and two step login on the account.
- Delete the photo version from your camera roll once it is saved.
On iPhone, you can also use the Hidden album, which is locked with Face ID or a passcode. Google Photos has a Locked Folder too. These are good for private photos you want to keep in your photo app but out of view.
How to Handle Years of Unsorted Pictures
Maybe you have 20,000 photos. Or 50,000. Years and years of them, never sorted. Just thinking about it is tiring.
Here is the good news. You don’t have to sort them all. And you don’t have to do it in one go.
Here is the plan I used for my own backlog:
- Back it all up first. Before you delete anything, make sure there is a copy somewhere safe.
- Start with the most recent year. It is the freshest, and the easiest to sort.
- Do one month per sitting. 10 to 15 minutes. Delete the junk, heart the best ones.
- Skip what feels hard. If a month has lots of emotional photos, it is okay to come back later.
- Use search to clean big batches. Search “screenshot,” “receipt,” or “document,” and clear them in bulk.
At one month per day, you can clear a whole year in under two weeks. And you will feel lighter each time you finish one.
One warning. Don’t start by deleting from old years without a backup. The 2024 Backblaze survey found that 74 percent of US computer owners had deleted important data by accident. Back up first, then clean.
When Sorting Every Single Photo Isn’t Worth Your Time
I want to say this clearly. You do not need a perfect photo library. That is not the goal.
The goal is to find the photos you care about when you want them. If search can already find “beach 2019,” you don’t need a beach album. If you never look at your 2014 photos, you don’t need to sort them.
Here is when I stop sorting:
- When the junk is gone and the best photos are hearted.
- When search finds what I need in under a minute.
- When the next step would take hours for very little gain.
It is fine to have a messy middle. Keep the junk out, mark the best, and let the rest sit. A good enough library you actually use beats a perfect one you never finish.
Create a Simple Archive for Older Memories
This is the archive step. Older photos need a safe, simple home that does not depend on one phone or one account.
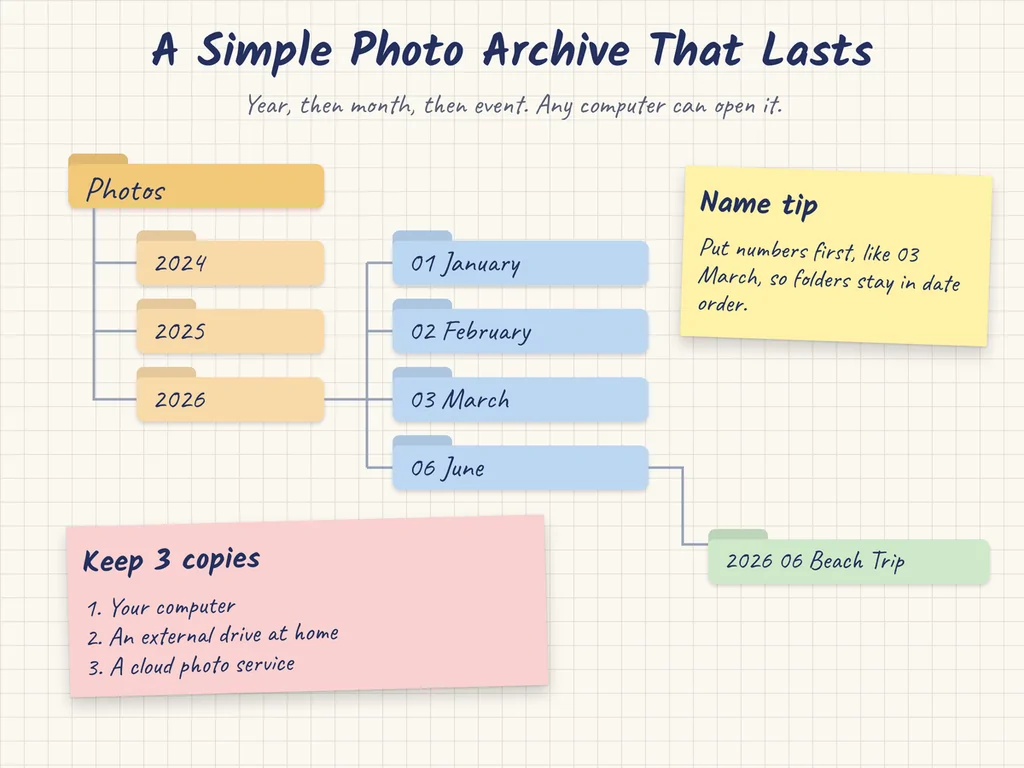
I keep a plain folder setup on my computer and in my backup:
- A main folder called “Photos.”
- Inside, one folder per year, like “2024,” “2025,” “2026.”
- Inside each year, one folder per month, named with the number first, like “03 March,” so they sort in order.
- For big events, a folder name with the date first, like “2025 06 Ali Wedding.”
That is it. Year, then month, then event if needed. Any computer can open it. It does not need a special app. And in 20 years, it will still make sense.
Now protect it. The US agency CISA suggests the 3 2 1 backup rule: three copies of your data, on two different types of storage, with one copy off site. For photos, that could be:
- Your computer
- An external hard drive at home
- A cloud photo service
Check your cloud space too. Since June 1, 2021, new Google Photos uploads count toward the free 15 GB that is shared with Gmail and Google Drive. So a big photo library can fill it fast.
The Monthly Photo Cleanup That Takes Minutes
This is the maintain step. Once your library is in shape, a monthly cleanup keeps it there. Mine takes about ten minutes, on the first Sunday of the month.
- Scroll the past month. Delete blurry shots and junk.
- Clear screenshots. Copy any info you need, then delete.
- Pick the best. Heart three to ten photos from the month.
- Move reference photos. Into notes or your Reference album.
- Check Duplicates. Merge any the phone found.
- Check backup. Make sure it ran.
Ten minutes a month is two hours a year. That is a small price for a photo library you can enjoy and search with ease.
Make Future Photos Easier to Organize From Day One
The best cleanup is the one you never have to do. A few habits at the moment you take a photo can save you hours later.
- Take fewer, better shots. Pause before you tap. Take three, not thirty.
- Delete right away. After a burst, pick the best and delete the rest while you are still there.
- Stop auto save in chat apps. Many messaging apps can save every photo to your roll. Turn that off in their settings.
- Use notes for info photos. Snap a receipt into a note, not your camera roll.
- Name trip albums on day one. Make the album as soon as you land, and add photos as you go.
- Keep location on for your camera. It helps search find photos by place later.
Small habits like these keep the pile from ever growing back. And the next time you want to find that one special photo, it will take seconds, not 25 minutes.
FAQs
What is the fastest way to organize thousands of photos?
Back them up first. Then work one month at a time, starting with the most recent. Delete the junk, heart the best, and let search handle the rest. Don’t try to put every photo in an album.
Should I delete screenshots?
Most of them, yes. Copy any info you still need into a note, keep the few that are real memories in an album, and delete the rest. Deleting a screenshot as soon as you are done with it saves lots of cleanup later.
How do I find duplicate photos on my phone?
On iPhone, open Photos and look for the Duplicates album under Utilities. You can merge copies there. On Android, scroll through bursts and similar shots, keep the best one, and delete the rest. There are also cleaner apps that can help.
Is it safe to store photos only in the cloud?
It is better to have more than one copy. The 3 2 1 rule from CISA suggests three copies on two types of storage, with one off site. A cloud service plus an external drive at home is a good start.
How should I name photo folders?
Use the year and month first, then the event. For example, “2026 03 Lake Trip.” This keeps your folders in date order on any computer, with no special app needed.