30 Study Desk Organization Ideas for Students

I used to think a messy desk was just a small thing. Then I lost a full test sheet under a pile of old notes. That day I got the point.
A messy desk costs you more than looks. Each time you hunt for a pen, your brain burns time and power. Small acts like this add up. It is called decision fatigue. You use your best mind on where stuff is, not on the work.
Science backs this up. A study from Princeton found that clutter in your sight fights for your brain’s focus. So less mess can mean more calm.
I am not asking for a “perfect” desk from a photo. Real life is not that. You have bags, cups, and late nights. So all of these ideas are made for real kids and teens with real days. Pick a few, try them, and keep what works.
1. Create a “Starting Point Zone” for Every Study Session
Most desks fail for one big cause. You sit down and do not know where to start.
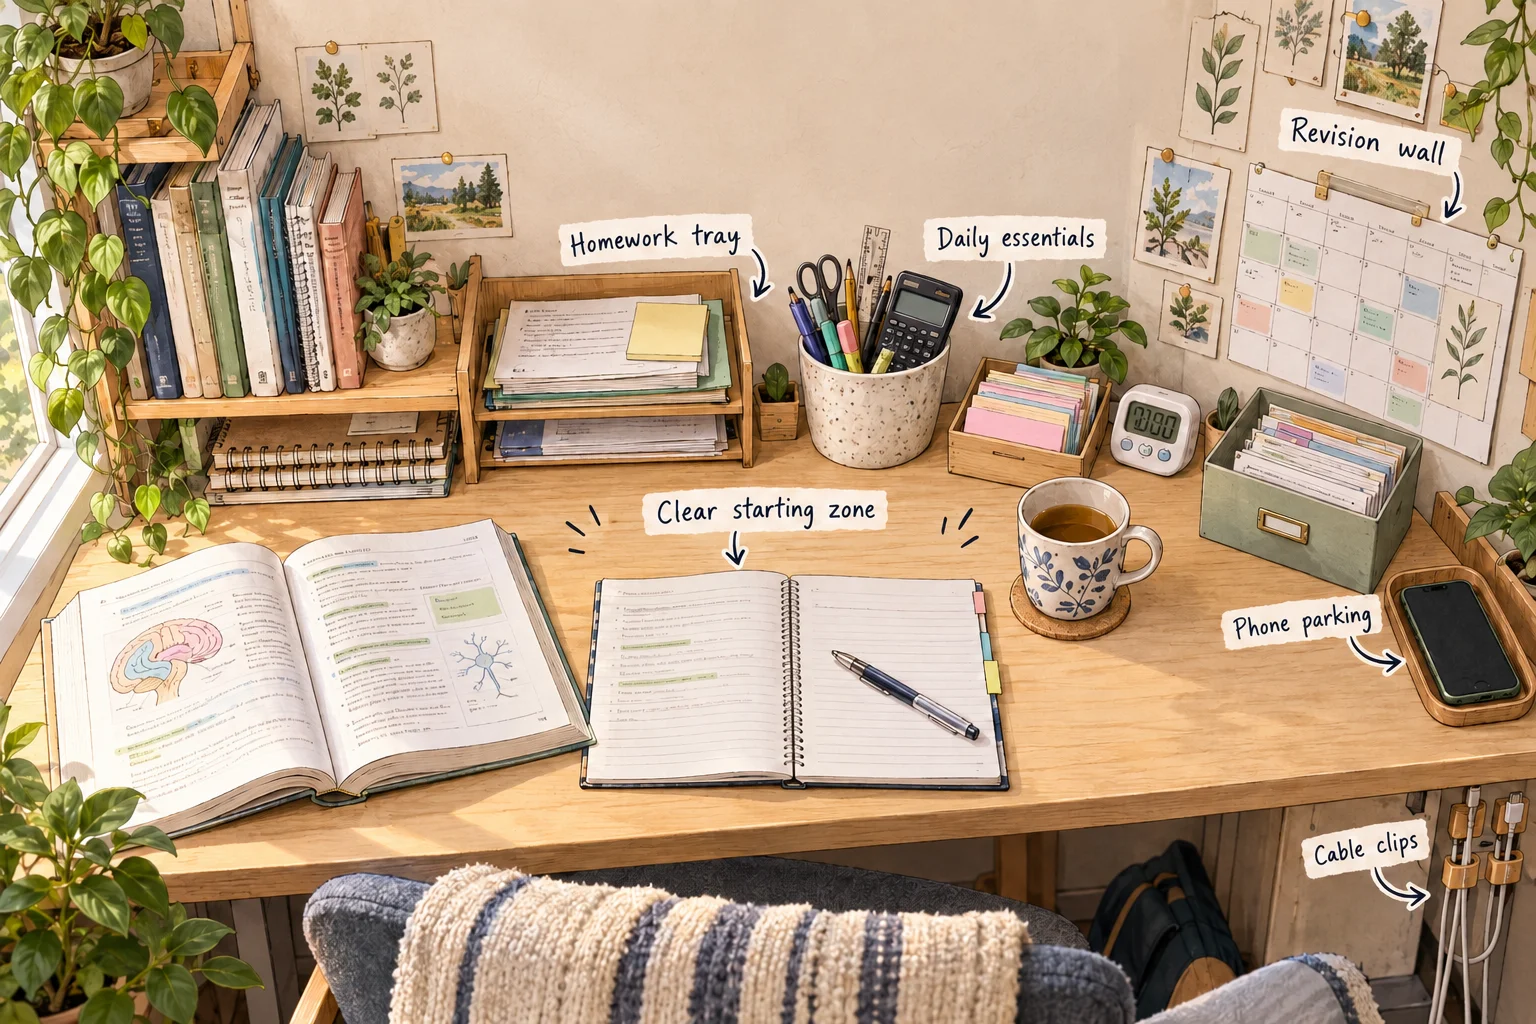
Fix that with one clear spot. Keep a small area of your desk empty. That is your start zone. Each time you study, you put just one subject there.
Say you have math today. Books and pens for math go in that spot. Nothing else. When you are done, they go back home.
I tried this for a week. I felt calmer right away. My desk stopped looking like a yard sale.
Do not spread all your books out at once. It feels like work, but it is just a mess.
2. Design Your Desk Around Your Most Frequent Tasks
Do not set up your desk by object. Set it up by what you do most.
Think of what fills your week. Then match your desk to it.
If you have a test soon, keep past papers, a timer, and a list close by. If you learn online, keep your laptop, a headset, and a charger in easy reach. If you draw or make things, keep tools in a tray on top. If you write a lot, keep notes and a book stand close.
Ask one thing. “What do I do at this desk 80 percent of the time?” Then build for that first.
3. Use the “Three Layer Desk System”
Think of your desk in three layers. It is like a small shop.
Layer 1 is the daily zone. This is what you can grab with your arm and no walk. Pens, a notebook, a calculator, and a planner live here.
Layer 2 is the weekly zone. You need these a few times each week. Think of guide books, files, and study sheets. A shelf or a side rack works well.
Layer 3 is the storage zone. Extra supplies, old notes, and things for one season go here. Use a box or a drawer.
The rule is easy. The more you use it, the closer it sits to you.
4. Make a Distraction-Free Corner on Your Desk
Your eyes pick up all that sits in front of you. Even if you do not look, your brain still sees.
So clear one part of your desk. Keep only study things in your view. No snacks, no toys, no loud stuff.
A study in 2017 by a team at the University of Texas found that a phone on the desk, even face down, can cut focus. So put it out of sight. A drawer is best.
Then build a “focus trigger.” It can be a lamp you turn on just for study. When it glows, your brain learns it is time to work.
5. Build a Homework Drop-Off Station
Lost work is the worst. You did it, and then it was gone.
Make a small home for work that is done. A tray, a folder, or a flat box will do. I like a tray with 3 slots.
Slot one holds work that is done and ready to hand in. Slot two holds work that a teacher gave back with notes. Slot three holds tasks for the next few days.
Each night, check the tray. Each morning, grab what you need. You will not lose a page again.
6. Organize Your Desk According to Your Energy Levels
Your energy goes up and down. Your desk can help with that.
Put your hard tasks in the easiest spot to reach. If math is hard for you, keep math gear at the front. You will not have to fight to start.
Keep fun tools in sight too. Colored pens or a sketch pad can lift your mood.
Keep dull, routine stuff out of view. Old forms and spare paper can hide in a box.
I do my hard work in the morning, so my hard books sit up front then. At night I swap them.
7. Create a “Tomorrow Preparation” Desk Routine
Spend 5 minutes at night. It saves a lot of stress at dawn.
Put tomorrow’s books on the desk. Open your notebook to the right page. Set your laptop near, and plug it in.
When you wake up, your desk says, “Come on, we start now.” No hunt, no rush.
This also helps your sleep. Your mind knows all is set, so it can rest.
8. Use Color Coding Without Creating Visual Noise
Color can help. Too much color hurts.
Pick 3 or 4 colors, no more. Give each one a job. Say blue for math, green for science, and red for tasks that are due soon.
Use the same colors on folders, tabs, and pens. Your brain will link them fast.
Do not decorate every inch. A calm desk is easy on the eyes. If it looks like a rainbow blast, you will tire fast.
9. Turn Your Wall Into a Memory Support System
Your wall is free space. Use it.
Put a revision calendar at eye level. Add a board with key rules and facts. Make a word wall with new terms you need to learn. Use a long strip of paper for a project timeline.
Here is a fact. Seeing a thing many times helps you keep it. That is why a quick glance at a wall chart works well.
Change the wall each month. Old facts blend in and you stop seeing them.
10. Create a Mini Exam Preparation Station
Test time needs its own spot. It can be one corner or one box.
Fill it with past papers, flash cards, highlighters, a timer, and a check list of topics. Tick each topic off when you feel good on it.
Timed tests are strong. Research on “retrieval practice” shows that quizzing yourself beats just reading again and again.
When exams end, pack the box and put it away. Your desk gets its space back.
11. Organize Cables Like a Professional Workspace
Wires are the worst mess. They knot, they hide, and they steal your calm.
Use clips or tape on the desk edge to hold each cord. Give your laptop cord, phone cord, and headset cord a spot each. Tag both ends with a small label, so you know which is which.
Run an extension cord along the wall or behind the desk. A small box can hide a power strip.
Make a charge corner. All cords end up in one place. It looks clean and it feels good.
12. Make a “Technology Parking Area”
Your gadgets need a home, just like a car needs a spot.
Pick one small area. A tray or a dock is fine. Park your tablet, phone, and spare parts there. Add the chargers too.
When you are not using a gadget, it goes back to the spot. You always know where it is.
Bonus: when your phone is parked away from your books, it can not pull you off track.
13. Use Small Space Desk Organization Tricks for Tiny Rooms
Small room? No worry. I have lived in one. It can still work.
Go up, not out. A wall shelf gives you room with no desk loss. Use a rack that hangs on the desk edge. Try a foldable box that you can flatten when done.
Use the floor under the desk too. A slim cart with wheels holds a lot. The back of a door can hold pouches for pens and paper.
Every inch counts, so make each one do a job.
14. Create a Portable Study Kit
Some kids study in a room, a class, and a library all in one week. A kit helps you move with ease.
Grab a small pouch or bag. Fill it with pens, a pencil, a ruler, and sticky notes. Add a USB drive, earphones, and a mini note pad.
Keep it packed at all times. When you go, just pick it up.
I keep my kit by the door. It saved me on more than one rushed day.
15. Separate Active Notes From Archived Notes
Old notes bury new ones. Split them.
Active notes are for this term. Keep them in a binder on your desk. Old chapters go in a box on a shelf. Key papers, like formula lists or rule sheets, get their own file.
Once a month, move done stuff to the box. Do not throw it out yet. You may need it for a final test.
Your desk stays light and you still keep it all.
16. Use a “One Touch Rule” for Desk Clutter
Here is a rule that changed my desk. Each item gets one home.
When you finish with a thing, put it home right away. Do not set it down “for now.” That “for now” turns into a pile.
If you move a thing 3 times, its home is wrong. Pick a new spot and stick to it.
It feels small, but it works. Home for each item means no more hunts.
17. Design a Desk That Supports Better Posture
Your back will thank you. Long hours of study hurt when your setup is off.
Put the top of your screen at or a bit below eye level. Keep it about an arm’s length away. Sit with feet flat on the floor and knees near a right angle. Keep your elbows bent at about 90 degrees.
When you read on paper, tilt the book up. A stand or a thick binder can help. Place a lamp on the side opposite your writing hand, so no shadow falls on the page.
Also try the 20-20-20 rule that eye doctors share. Each 20 minutes, look at something 20 feet away for 20 seconds. Your eyes get a rest.
18. Add a Visual Progress Tracker
Seeing your growth feels great. It keeps you going on hard days.
Try a board for tasks you finish. Move a note from “to do” to “done.” Add a count down for your next test. Make a chart for books you read. Use a habit grid and mark each study day.
I love ticking a box. It is a tiny win, but tiny wins add up.
Keep it simple. One tracker is plenty to start.
19. Organize Your Desk for Group Study
Study with friends is fun, and it can work well. Your desk just needs a plan.
Keep a spare chair or a stool close. Clear a shared area where all can put books and notes. Have a small white board or a big pad nearby, so all can see the ideas.
Set a rule too. Phones go in a bowl. That keeps the group on task.
After you finish, wipe the desk and reset. Your next solo session will be smooth.
20. Create a “Mistake Review” Section
Your errors are gold. They show what to fix.
Set up a folder or a page for them. Put wrong answers there. Add teacher notes and fixes. Write the rule or the right way next to each one.
Look at it each week. You will see the same slips again and again. Once you spot them, they are easy to stop.
Studies on learning show that fixing errors and trying again helps memory. So this small folder can boost your grades.
21. Use Hidden Storage for Less Important Items
Not all things need to be seen. Hide the ones you use less.
Use drawers, lidded boxes, and baskets. A box by your bed can hold books you read for fun. A bin under the desk can hold art gear.
Pick boxes that match, so the room looks calm. Add a label on each box. You will not have to open them all to find one thing.
Out of sight is good for your focus.
22. Build a Night Before School Reset System
A short reset each night makes mornings easy. Here is my list.
Toss scrap paper and trash. Charge your devices. Pack your bag with all you need. Set out tomorrow’s books.
It takes about 5 minutes. You can even play a song and turn it into a fun habit.
Wake up, grab your bag, and go. No panic.
23. Create a Reading-Friendly Desk Setup
Long reading can tire you out. Set up your desk to ease that.
Use a book stand so you do not bend your neck. Add a warm lamp that lights the page and not your eyes. Keep a small holder for bookmarks and sticky flags.
Tilt the book at a comfy angle. Your head should stay up, not bowed.
Take breaks too. Stand, stretch, and sip water. Then go back to the page fresh.
24. Organize Stationery Based on Frequency
Do not toss all pens in one cup. Sort them by how much you use them.
Daily gear is a pen, a pencil, and an eraser. Keep these in a cup or tray at the front of the desk.
Sometime gear is markers, art tools, and spare parts. Put these in a drawer or a box.
Now your hand finds the right tool fast. You never dig past glue and tape to find a pen.
25. Create a “Focus Atmosphere” Around Your Desk
Your space has a mood. Shape it.
For light, use a lamp with a soft white glow at night. Sit near a window by day if you can. For noise, try ear plugs, soft music with no words, or a fan hum. For heat, keep the room cool and calm, since a warm room can make you sleepy.
Add one thing that lifts you up. It can be a quote or a small object. Just one.
26. Use Digital Organization Alongside Physical Organization
A neat desk with a messy laptop still slows you down.
Make folders on your screen for each subject. Use cloud storage so you never lose a file if your laptop dies. Keep digital notes in one app, not three.
Name files the same way each time. Try this: subject, topic, date. Like “Math_Algebra_0929”. You will find things in seconds.
Spend 5 minutes a week to clear your downloads.
27. Create a Desk Cleaning Schedule That Students Can Actually Follow
Daily deep clean? No way. Nobody keeps that up.
Try this small plan.
Do a 5-minute reset each day. Put things back in their place, toss the trash, and wipe down your desk surface. Do a deeper tidy once a week. Look through all papers once a month and sort what to keep or remove. For better planning and staying consistent with your routines, you can also use SchedBuilder to organise your tasks and daily schedule.
Pick a set time. Right after dinner works for me.
A plan that is easy will last. A plan that is hard will die by week two.
28. Personalize Your Desk Without Making It Distracting
A desk should feel like yours. Just keep it light.
Pick one item that inspires you. Add a small plant, since green things can lift your mood. Put up one photo that means a lot. Show one prize or a card you earned.
Do not add too much. Five toys and ten notes will pull your eyes all day.
Less is more. A few items with meaning beat a wall full of stuff.
29. Make Your Desk Adaptable for Different Subjects
One desk, many subjects. Make swaps quick.
For math, set out a calculator and a formula sheet. For writing, place your notebook and research on top. For art, bring out tools and a mat.
Keep each set in its own box or tray. When the subject changes, swap the box. It takes one minute.
Then put the old box back. Your desk stays clean, and your brain gets a signal for the new task.
30. Build Your Own Student Desk Organization System
Now it is your turn. Take what fits you and drop the rest.
Mix storage, flow, study habits, and your own taste. Some kids need bright and loud. Some need plain and calm. Both are fine.
Test your setup for two weeks. Note what annoys you. Fix that one thing, then test again.
The best desk is the one that makes study easy for you. That is it.
Conclusion
A study desk is not just a table. It is where you learn, grow, and build your future.
Small changes can bring big calm. One tray, one box, or one 5 minute habit can help.
Start with one idea today. Then add one more next week. Soon you will have a system that fits your life.
FAQ
How do I organize my study desk if I have very little space?
Go up and go under. Use wall shelves, a rack on the desk edge, and a slim cart. Keep only daily items on top.
What should every student keep on their study desk?
Pens, a pencil, an eraser, a notebook, a planner, a lamp, and a water bottle. Add a laptop or a calculator if you need them.
How often should students clean their desks?
Do a 5 minute reset each day. Do a deeper tidy each week. Sort papers each month.
How can I organize my desk without buying expensive organizers?
Use what you have. Jars hold pens. Shoe boxes hold papers. Cereal boxes cut in half make good file holders.
How do I stop my study desk from becoming messy again?
Give each item one home. Put things back right after use. Do the nightly reset. Small habits beat big cleanups.